Weather predictions are rarely correct in the marine environment. From my experience they are typically close or way off. This past Saturday was the well off experience. Weather predictions for the area were winds light and variable seas 1-3 inches. I knew something wasn’t right prior to leaving the house around 5:00 am. It was already breezy. A quick text to Capt. Jim and the typical Capt Jim response “It’ll lay down”.

Met Jim at the drop in and well it was really windy but hell we went out anyway. About 100 yards from shore begun to understand how rough it was. Paddled past a boat with two old times aboard. They just looked and i could tell they were thinking to themselves we were crazy. I asked one of them if they had seen any bunker around. The guy just nodded that he did not.

The waves were immense at 3-4 foot but manageable as paddling into them was better than going sideways. Two miles later reaching the area of the Raritan Reach channel planned to fish. Attempted to fish but it was just to rough too fast of a drift and really felt unsafe. The options arose. Beach on Staten Island and wait a little while to see if the wind was going to lay down. Or high tale it back to the launch to go fish the bay side of Sandy Hook. It took about 5 minutes and we were turned around bow to land. Back to  the drop in. The ride in with the large waves and following sea was uneasy but an easy paddle back.

Once loaded up it was about a 40 min drive roughly 30 miles driving distance to the tip of Sandy Hook. The location is Fort Hancock which was an army fort built to defend the waterways and ports to New York City active from 1859 then decommissioned in 1974. It is now a national park and is part of the Gateway National Park System. There are many other things to do in the park that involve the outdoors.cuda short fluke (Large)

So it was much calmer since the land blocks the wind and waves that were full force at the previous location. We dropped in and begun to fish. There were a few other kayak anglers there of whom I knew one of them. They stated the fishing wasn’t really good and the incoming tide was against the wind there.

It seemed to be a slow pick but there are big fish in the area. I ended up loosing one because it wouldn’t fit in my net. A few more short fish for the day the largest landed by myself being a 15.5 incher. Jim had a decent one over 19″. The drift was fast and i couldn’t hold bottom with a 3 oz Spro. Jim was using what looked like minimal a 4 oz huge buck tail. It wasn’t long after that 3:30 Pm rolled around and called it a day.

Once on shore and walking your yaks through a wedding setup a park ranger came by and checked our catch and asked us a few questions. She was actually pleasant to communicate with.

This concluded the fishing trip. It was a nice ride home although I was exhausted. Im looking forward to getting out on the water again asap.

Check back for more fishing journal entries in the future!


IMG_1428 IMG_1429Water, salt, dirt, and corrosion are the worst components for damaging your cable connectors.

Unlike a motor boat where the cable connectors are typically protected from most of the harsh weather conditions kayaks are completely exposed. Were out there taking waves over our bows landing on sandy beaches and constantly getting rained on.

For a small cost you can protect your cable connectors to obtain the maximum lifespan out of these expensive cables.

The  solution is simple.  Dielectric Grease and Caps that are designed to protect the IMG_1425
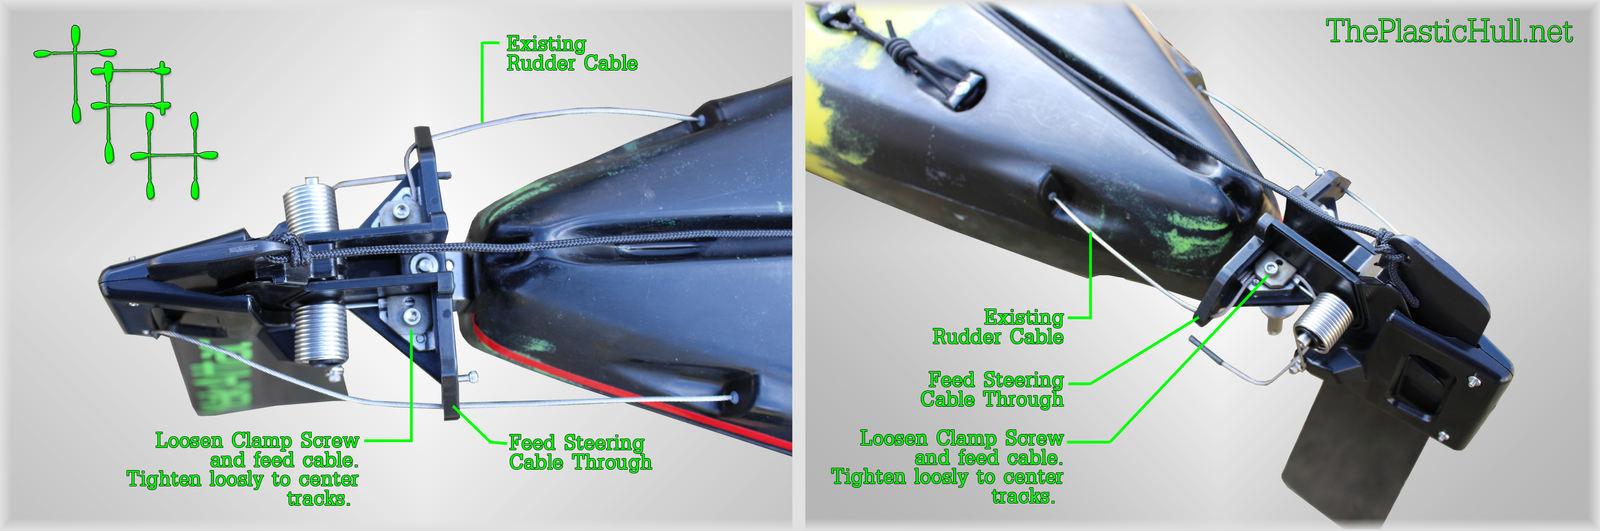
patruding end of  a nut and bolt.

IMG_1426The result is a water tight protected Cable plug. To should still be careful  takes it from getting sand or other debris. The grease it will stick and make  a pretty big mess.

IMG_1393

You can find these screw protectors at your local hardware store. They come in different sizes so measure the cable end you would like to protect prior to purchasing them.

I put the dielectric grease on the female plug then place the cap over it. This added protection should prevent corrosion and extend the life of your electronics cables.


Since the Cuda 14 was released by Jackson Kayak paddlers have expressed that they felt the Smart Track Rudder was too small for the boat. There is now a solution for that.  The SEA-LECT Designs Trucourse Rudder system. The function of the rudder on a kayak is to increase the tracking in windy situations.  As the paddler adjusts the rudder to compensate for the wind keeping the kayak straight will save the paddler energy.

The Jackson Kayak Cuda 14 used in this modification write up had a factory installed Smart Track rudder system at the time of purchase.
It is possible to use the factory installed steering components and line to raise/lower the rudder with a few slight modifications. ThePlasticHull.net  at this time would recommend that you order your kayak from your local Jackson Kayak Dealer without a rudder system installed and that you would do the entire install with SEA-LECT Designs rudder kit following that kits specific manufacturers instructions until and if this rudder system is ever becomes an option from the Jackson Kayak factory. Your local dealer may also have a shop where they may be able to provide the service to install the rudder kit for an additional charge.

This modification will vary from a full kit install being that there was no need to install sliding foot braces steering cables or trim lines plus run all the tubing these cables and lines require to travel through. Merely this was done to see if the system would work on the Cuda 14.


The Diagram to the left shows the location of the factory trim line and then the modified location to work with the SEA-LLECT Designs Rudder.


The new drilled hole is 2 inches from the center line of the edge of the hatch depression to the center line of the drilled hole for the trim line tubing & rope itself. This is only necessary of modifying a Cuda with a factory rudder installed.


Also depicted is the factory installed steering cable and rudder cable. The location of the steering cable does not need to be modified here. Only the connecting hardware needs to be removed. This is done simply by removing the cotter pin pushing the cable inside the mounting bracket and removing the sedge inside. This will free the cable and allow it to be removed.


rudder cabling graphic

The SEA-LECT Designs rudder has an innovative way of  fastening the steering cables. Using an Hex Key tool remove 2 screws each to remove the covers on each side. By loosening up the clamp screw and running the steering cable to the center and then to the rear and tightening down just a little bit.  You will need to center the tracks to the rudder to do this slide the tracks even with the track and this will be your center point. Pull the cable through the rudder till taught but not to move the track off center. Then tighten down the clamp screw.

rudder trim line

The image above shows the location of the trim line and the new hole drilled along with the 1/4″ wire hanger and stainless steel screw. The existing hole that the trim line penetrated at the stern was just filled with a bead of Lexel. Now to change out the trim line function. Remove the screw at the front of the existing line. If your Cuda has not had a factory installed rudder there should be a plastic screw in this place. Replace this with a screw or if rudder package is installed use the existing screw but add a rigging hook. This will be for the trim line to loop over when the rudder is in the up position. Untie the bungee from the trim line. Now you will pull the trim line to the bow until the rudder is in the up position. This is where you will tie a non slipping loop knot so when looped around the rigging hook the rudder stays in the up position. Now to lower the rudder simply pull the loop off the hook letting it go. The rudder will slide down.

rudder trim

Below is the modified rudder trim control. By releasing the loop from the hook the rudder will go down. By pulling the trim line and hooking the loop the rudder goes up and locks.

trim control

The rudder also has an adjustable depth control. You may want to adjust the height when fishing flats and shallow areas then adjust it down for deeper water. Also for best performance the rudder should not be pulled all of the way up and forward. It could cause the rudder to get stuck in the up position. You may want to tie a knot in the trim line at the stern of the kayak to stop the rudder from being pulled too far.

Rudder Adjust


Disclaimer:
Installing hardware may cause damage and/or void manufacturer warranties.  ThePlasticHull.net its authors or any other source of information on this website is in no way responsible for your actions nor any type issues or damage that may occur.  The information provided on this website is a free reference guide only. The authors of all information, sponsors and the owners of the website that host this information are not liable for any problems or issues that arise from the use of this information. Users of this information hereby acknowledge that all use of this information is done by their own free will, at their own sole risk, understanding that destruction of property, injury, or death could occur.
Page 3 of 612345...Last »