A few new modifications to the Torqeedo steering system.  First of all I purchased an aftermarket anodized aluminum steering bracket which is sold by The Kayak Fishing Store. It was fabricated to replace the stock plastic bracket. There has been issues with the stock bracket breaking when under stress of steering and torque from the motor. The aluminum bracket is much more rigid being made out of metal and most likely will last a life time if properly cared for.

STEERING BRACKET

products steering upgrade


The next upgrade is a stainless steel quick release 3/16″ closed eye spring clip for the steering cables that connect to the steering bracket. This clip enables the attach and detaching of the steering bracket in seconds instead of the previous setup using the pin and split ring.


This modification was easy. Simply take the existing cable ends off by removing the cotter pin and slide the cable out. You will now clamp down the foot brace track so it is aligned with the track (centered). Clip the new spring clip to the steering bracket on the Torqeedo. Slide a 3 inch piece of 1/4″ heat shrink tubing on the cable. Then feed the end of the cable through one side of the cable crimp. You will now feed the cable through the eye on the clip and back through the other side of the crimp. Center the motor and slide the crimp up so there is around 3/8″ – 1/2″ diameter loop. make sure the cable is tight going to the foot brace. Crimp with a pair of heavy duty pliers and repeat the same steps for the opposite side.


Once this step is completed it should look like Figure A below.

steering clip upgrade

Figure B above illustrates the completed modification with the heat shrink tubing.

The links below will direct you to the parts.

Steering Bracket

Spring Clips

Quick Link


There will be other modifications in the future. Please check back to The Plastic Hull for mods and subscribe for instant emails on new posts.

403 ultralight

403 ultralight complete freature

TQ MOD FI


One of the largest tournaments on my schedule is the Jamaica Bay Kayak Fishing Classic Tournament. Located in Brooklyn NYC the event draws around 300 anglers from as far as Toronto. The main fish targeted are Striped Bass Weakfish Blue Fish and added last year Fluke ( Summer Founder).

This year is a new one in the chapter for myself. I am registered in the electric division. A division I never thought I would compete in. It is a challenge to fish the electric division from the mere fact that there is no electricity at the camping area. The only power available is from gas generators.

wundguru 05-15-14Unfortunately this year it doesn’t look like the weather is going to cooperate.

Wind and rain for Friday. I have a feeling the committee may officially postpone the start of the tournament till Saturday morning.

Saturday looks good so far!

I am bringing both the Jackson Kayak Big Rig with the Troqeedo and the Jackson Kayak Cuda 14. The Cuda is more manageable with my current kayak cart. Just in case I want to drop in near JFK Airport at Grassy Bay off the Cross Bay Boulevard. Theres a beach there that’s a long haul for the big rig on a cart on sand. The drop in where the tournament headquarters is at Floyd Bennett field is easy due to it being a huge sea plane ramp. Its very Big Rig friendly!

Looking forward to camping and hanging out with fellow fishing buddy’s long term and new. Of course cant forget the food!! If  your going stop by and say hello. Have a bite to eat drink a beer and trade some fishing stories.

As I write this my buddies are there prefishing. Wish I was there right now!!!

Jackson Big Rig Torqeedo install. 2 pix horizontalThe Jackson Big Rig with its 37″ width is very wide for a typical kayak hull. Paddling such a craft in high winds could pose a challenge. People say the electric motor will possibly be the future of kayak fishing. Opening the Box the Torqeedo is packed with the very important install manual in 5 different languages, the motor itself, the lithium ion battery, hardware, the battery charger with a North America plug and a euro adapter, Throttle Controller, cables, rope, and the important safety kill switch magnet. At the bottom of the box there is a surprise extra large dry bag for storing your motor when not in use. The Torqeedo Ultralight 403 motor system features are great as the entire system weighs 16 lbs. Yes this includes the Motor itself the Battery and the Throttle Controller hence ultralight. The throttle controller is really handy as it reads information  from a GPS located within the battery housing. This calculates your speed current battery charge percentage. Distance until charge is needed and amount of wattage output power. The battery must be in a clear view of the sky for the speed and distance left to travel to be accurate. Torqeedo also has announced its new smart phone app called Torq Trac is available. The app connects via Bluetooth (WIFI) to the motor system. The app is neat as it will allow you to use interactive maps showing how much range is left in real time and will let you set way points for navigation. It also allows you to view performance readouts of the motor system and if there is any errors it will read out in plain text not just give a code. Check it out at the Torqeedo Website.

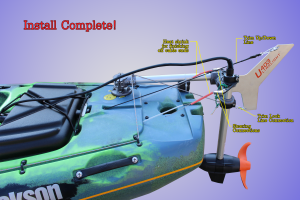
For the install… The manual has decent instructions and will run you through the install step by step. Read it first to familiarize yourself. There are 2 different ways to install the motor. One option is for the motor to be mounted in a fixed position utilizing a kayak rudder for steering. The other option utilizes connecting cables to the foot braces which allow swiveling of the motor itself for steering with your feet from the cockpit. This install write up explains the second option which uses the motor for steering. The Big Rig used in this install was previously factory fitted with a rudder package which saved the huge step of installing the foot braces along with the tubing and aircraft cables creating the ability to steer from the cockpit using your feet.  The Big Rig is set up nice as the use of the factory rudder up/dn trim line for the motor trim line and the factory installed anchor line system for tying the trim down on the motor so it will stay lowered when in reverse.
After 2 seasons i have modified the location of the steering bracket. Mounting the steering bracket at the bottom of the pivot point will work with the factory cable location.  (This is another option the Torqeedo Install Manual does not describe.) ball placement (See Update)The major thing is keeping the main boom as level as possible so when the motor is trimmed down it is completely level as it will result in the highest level of performance. To do this you will need a level. First you need to be sure the kayak is as level as possible. The big rig having a pretty much flat bottom this was an easy task. Simply set the level on the deck where the seat would go. If the deck is level the entire boat is level. (See Update) Now to set the mounting ball. You will want to choose the location by linking the motor to the boom. In this case mounting without the factory rudder the motor will need to be positioned at the center of the stern. Once positioned place the ball in the boom bracket and locate the flattest area of the kayak to mount the ball. Once in position  marked the ball on each side with a metal scribe. Just scribe a minor scratch around the ball base so you can match up the position later. diagram Now with the ball separated from the boom place at the location where you marked and with a small center punch centered in one of the holes in the ball press firmly to make a punch for drilling. Drill the first hole. Once drilled place a bolt thorough the ball and the newly drilled hole. Thread the nut on the end inside the yak and tighten enough for positioning the ball for the next hole. align with your scribe mark again center punch the hole opposite the one you just fastened the bolt through.  Drill and fasten. Repeat this step for remaining holes. Once done remove the ball and re fasten along with the rubber gasket under the ball and the plastic plate on the inside. Now your mounting ball is set. Re-attach the boom but do not tighten completely. You must now level the boom to work with the rubber pad. Included with the rubber pad are 3 shims or spacers. Use these to adjust the height of the boom for leveling. Once level bolt down in place with 2 zip ties under the rubber brace for tying down the boom to the brace. This will give the boom extra support so it does not move when the motor is under torque in use. ball and boom torqeedo rear To rig the steering you will need to purchase additional parts. (See Update)You will need 2 Rudder Steering Fork ends, 2 Clevis Pins, 2 split rings, & 2 cable ends. (See Update)This will allow you to attach the steering cables to the Torqeedo steering bracket. trim linesThe Trim line or UP/Down control was easy. Used was the existing rudder up/dn trim rope. It came installed with the factory rudder system. There is also another line that ties to the bottom of the trim plate. This is to lock the motor in the down position if you would like to use reverse. If the motor is not tied in the down position it will tilt up when in use and could damage the motor. This line was installed through the anchor line tube. A zigzag cleat was added to the position pre-molded into the big rig with the factory threaded inserts using 1″ 1/4 20 bolts. The photo below is how everything should look. complete copy For the controller mounting you will need RAM Mounts RAM-B-103-238U  1″ ball & 1″ double sided arm. You can pair this with a YakAttack 1″ Screwball to mount on any Big Rig Track system or just purchase an additional 1″ RAM Ball for permanent thru hull mounting. Your local hardware store should have the screw hardware for mounting the ball to the controller. (Update) You will need a controller extension cable. With the extension cable you now may put the battery in the rear hatch. It will still read the GPS and the wires fit through the hatch with no problem. The battery is now out of the way of your crate or whatever you may put in your tank well. (Update)controllerFor a complete comparison write up of other Kayak Electric motor systems please check out Jon Shein’s article that he put together a few years ago. It is a great read and has a lot of good information for anyone interested in electric motors for kayaks! 2 pix torqeedo finished So far I have had the Big Rig out 3 times with the Torqeedo. The First time I previously posted with a video which was the test. (See UpdateThere is a cavitation issue I am trying to resolve.(See Update) The second time out Trolling all day and came back with 65% battery left! The third time ran out 1 mile at full power. To fish for an hour then ran in against a storm and the tide full bore and used 40% Against the wind and tide the Troqeedo was still able to go an average speed of 4.8 mph.

Again the Torqeedo Install Manual states it needs to be installed completely level. This is somewhat false. See my update of angling the top boom down to dip the water deeper in the water. This is due to the height the Big Rig sits out of the water. See Cavitation fix here.

Disclaimer:

Installing hardware may cause damage and/or void manufacturer warranties.  ThePlasticHull.net its authors or any other source of information on this website is in no way responsible for your actions nor any type issues or damage that may occur.  The information provided on this website is a free reference guide only. The authors of all information, sponsors and the owners of the website that host this information are not liable for any problems or issues that arise from the use of this information. Users of this information hereby acknowledge that all use of this information is done by their own free will, at their own sole risk, understanding that destruction of property, injury, or death could occur.

Other Torqeedo Posts:

403 ultralight complete freature

403 ultralight post freature2


Mounte Controller FI

footbrace FI (Mobile)


Page 23 of 33« First...1020212223242530...Last »