How To: DIY Waterproof Battery Box
This new Electronics Battery Box will accommodate a large 12v 12Ah sealed battery. Before drilling holes in a dry box make sure your box will fit through the hatch on your kayak.
Dimensions of the battery
Length 5.94 inches
Width 3.86 inches
Height 3.74 inches
Weight 7.95 lbs
You can find these batteries new on ebay for $20 – $30. The higher amp hour is good for running fish finder chart plotter combos with color screens. These use a higher amount of amps than the black & white units the 7.5 Ah batteries just don’t perform as well for a full day of fishing.
List of Materials:
- 1 Battery as mentioned above $23.00 ebay
- 1 Dry box that will accommodate the size of the battery $23.00 ebay
- 1 Small Cable Gland $1.00
- 1 Wire with inline waterproof connector (4 wire 4 pin) Possible future lighting or other accessories $4.80 Amazon
- 2 inline heat shrink inline wire crimp connectors
- 1 3″ piece of adhesive 1/2″ heat shrink tubing
Tools:
- Drill
- Heat Gun
- Wire Crimps/Strippers
- Drill bits/ Step Drill Bit
Install:
 Using pipe insulation fit the battery to the box. This will hold the battery in place so it doesn’t bounce around. Next drill a pilot hole using a 1/8″ drill bit. This will be the location of the cable penetration. You can pick pretty much any side. I would say avoid the top the bottom and the back. In this install I opted for the front under the handle. Once the pilot hole is drilled use the step drill bit to ream out the hole until the cable gland will thread in.
Once the cable gland is installed slide the cable with the connector through from the exterior. You will now pick 2 wires from the 4 to pair. Use the two inline heat shrink connectors Crimp and heat the one side to seal. Now slide over the 3 inch piece of adhesive heat shrink tube. Connect the inline fuse wire and the ground wire. Attach the terminal ends and your DIY waterproof electronics battery box is complete.
Waterproof Battery Box Modifications & Upgrades <— Click for updated post!!!!
Fitting the SEA-LECT Designs TRUCOURSE™ RUDDER to the 2014 Jackson Cuda
Since the Cuda 14 was released by Jackson Kayak paddlers have expressed that they felt the Smart Track Rudder was too small for the boat. There is now a solution for that. The SEA-LECT Designs Trucourse Rudder system. The function of the rudder on a kayak is to increase the tracking in windy situations. As the paddler adjusts the rudder to compensate for the wind keeping the kayak straight will save the paddler energy.
The Jackson Kayak Cuda 14 used in this modification write up had a factory installed Smart Track rudder system at the time of purchase.
It is possible to use the factory installed steering components and line to raise/lower the rudder with a few slight modifications. ThePlasticHull.net at this time would recommend that you order your kayak from your local Jackson Kayak Dealer without a rudder system installed and that you would do the entire install with SEA-LECT Designs rudder kit following that kits specific manufacturers instructions until and if this rudder system is ever becomes an option from the Jackson Kayak factory. Your local dealer may also have a shop where they may be able to provide the service to install the rudder kit for an additional charge.
This modification will vary from a full kit install being that there was no need to install sliding foot braces steering cables or trim lines plus run all the tubing these cables and lines require to travel through. Merely this was done to see if the system would work on the Cuda 14.
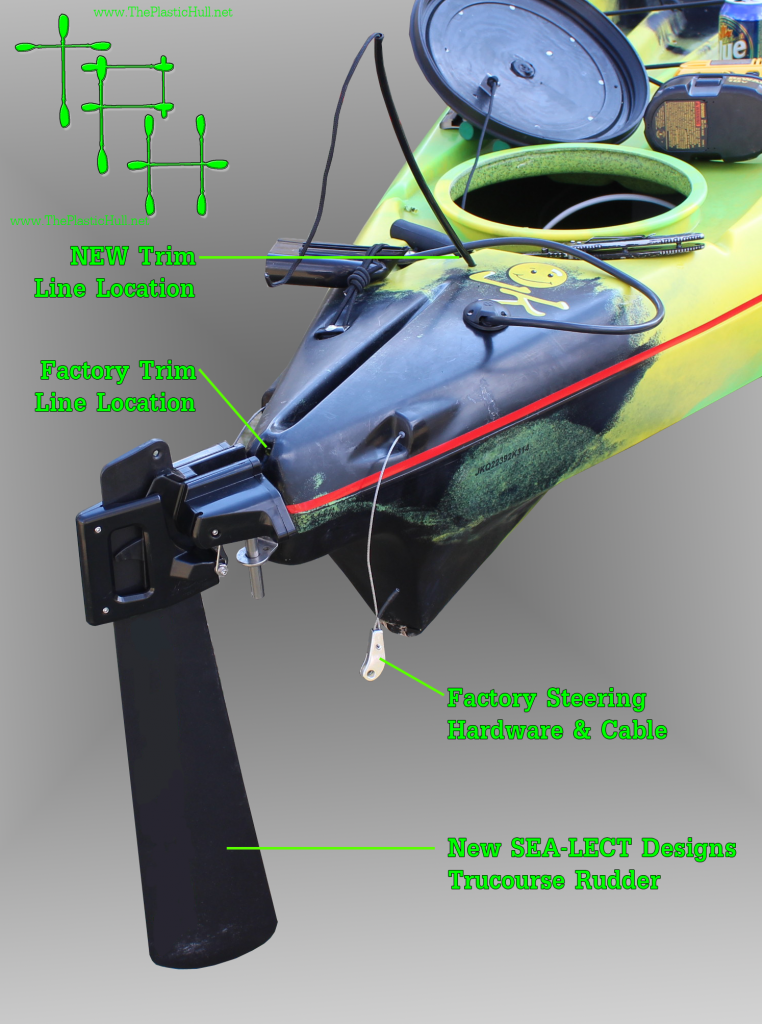
The Diagram to the left shows the location of the factory trim line and then the modified location to work with the SEA-LLECT Designs Rudder.
The new drilled hole is 2 inches from the center line of the edge of the hatch depression to the center line of the drilled hole for the trim line tubing & rope itself. This is only necessary of modifying a Cuda with a factory rudder installed.
Also depicted is the factory installed steering cable and rudder cable. The location of the steering cable does not need to be modified here. Only the connecting hardware needs to be removed. This is done simply by removing the cotter pin pushing the cable inside the mounting bracket and removing the sedge inside. This will free the cable and allow it to be removed.
The SEA-LECT Designs rudder has an innovative way of fastening the steering cables. Using an Hex Key tool remove 2 screws each to remove the covers on each side. By loosening up the clamp screw and running the steering cable to the center and then to the rear and tightening down just a little bit. You will need to center the tracks to the rudder to do this slide the tracks even with the track and this will be your center point. Pull the cable through the rudder till taught but not to move the track off center. Then tighten down the clamp screw.
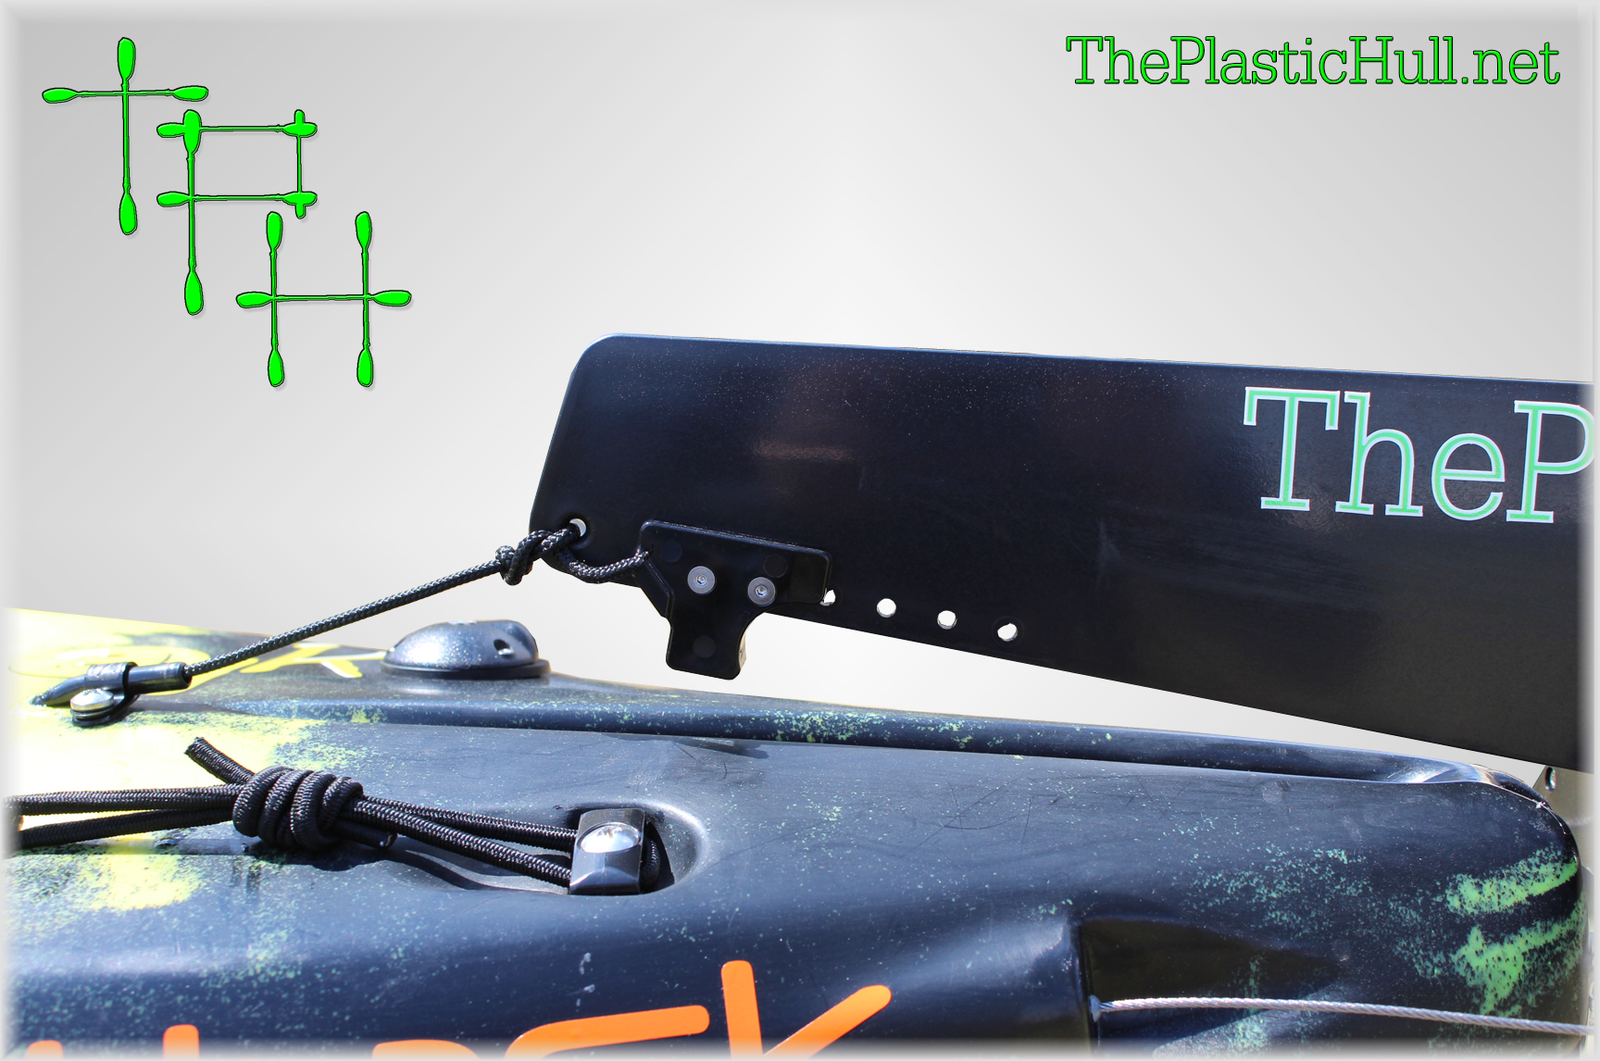
The image above shows the location of the trim line and the new hole drilled along with the 1/4″ wire hanger and stainless steel screw. The existing hole that the trim line penetrated at the stern was just filled with a bead of Lexel. Now to change out the trim line function. Remove the screw at the front of the existing line. If your Cuda has not had a factory installed rudder there should be a plastic screw in this place. Replace this with a screw or if rudder package is installed use the existing screw but add a rigging hook. This will be for the trim line to loop over when the rudder is in the up position. Untie the bungee from the trim line. Now you will pull the trim line to the bow until the rudder is in the up position. This is where you will tie a non slipping loop knot so when looped around the rigging hook the rudder stays in the up position. Now to lower the rudder simply pull the loop off the hook letting it go. The rudder will slide down.
Below is the modified rudder trim control. By releasing the loop from the hook the rudder will go down. By pulling the trim line and hooking the loop the rudder goes up and locks.
The rudder also has an adjustable depth control. You may want to adjust the height when fishing flats and shallow areas then adjust it down for deeper water. Also for best performance the rudder should not be pulled all of the way up and forward. It could cause the rudder to get stuck in the up position. You may want to tie a knot in the trim line at the stern of the kayak to stop the rudder from being pulled too far.


