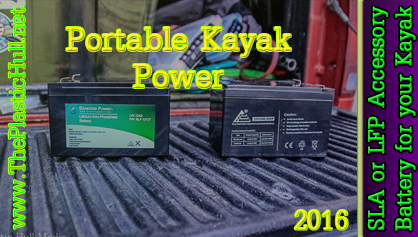
SLA or LFP Accessory Battery for your Kayak

IMG_6064In a short period of time Fishing kayaks in most cases a single user vessel have begun using many of the electronics that power boats use. Portable power has become a necessity. Running Fish Finders on a battery pack of AA batteries is a thing of the past. In the present we have Fish Finder/Chart Plotter combos, kayak lighting, and  the ability to charge battery powered devices while away from home is important.

Previously we built a waterproof battery box for a fish-finder/chart plotter. Since then there have been many advancements in batteries. This article explains the difference between the traditional Sealed Lead Acid Battery (SLA) and the latest Lithium-iron-phosphate battery (LFP). Here I list the pros and cons of both. You make the decision!


A SLA battery

SLA Battery Pros:

  • Inexpensive (Economically Friendly)
  • Fully Sealed Package
  • Rechargeable
  • Recyclable

SLA Battery Cons:

  • Poor weight-to-energy (8 lbs 12aH)
  • Cannot be stored in a discharged condition
  • Inconstant discharge voltage
  • Limited number of full discharge cycles
  • Lifespan (300 charge cycles)
  • Sulfation
  • Memory
  • Not Environmentally Friendly
  • Contains Lead

IMG_6141There are many cons to the SLA battery for use on a kayak the first being weight. The 12aH SLA will weigh in at 8 lbs. That’s a lot of weight to travel with on any kayak. Battery life is another issue you may get a season or two total out of the lifespan.

New and improved Lithium-iron-phosphate batteries (LiFePO4 or LFP) are slowly replacing Traditional SLA batteries. Although still pricey LFP batteries have many advantages over the previous generation technology of SLA’s.

LFP Battery Pros:

  • Excellent Weight-to-energy (3.5 lbs 12aH)
  • Very constant discharge voltage
  • Low Discharge Rate compared to SLA
  • Rechargeable
  • No Memory (Can Be fully Discharged without cell damage)
  • Lifespan (2000+ charge cycles 5-10+ years)
  • Recyclable
  • Thermal and chemical stable aka Safer (as opposed to Lithium Ion cells)
  • No Environmental Thermal concerns (provides maximum output at hot or cold temps)

LiFePO4 Battery Cons:

  • Cost (Expensive)
  • Contains Phosphates

Looking forward to this conversion. Will report on the experience in the near future.


Extended Use Review: EcoRox Bluetooth Speaker

Enjoy tune20150509_070708-2 (Large)s played wireless from your smartphone or Bluetooth enabled device with the EcoRox Waterproof Bluetooth Speaker! The EcoRox is a small rugged self powered and rechargeable lasting up to 10 hours of play time! The range of wireless play is around a max of 33 feet making it great for use on a kayak. Its IPX7 full submersible waterproof rating ensures the speaker to be protected against accidentally rolling your kayak. If not mounted it also floats!

The EcoRox is excellent for time spent out on the water when you’d like to enjoy music or even back at camp around the campfire. Its volume is loud enough to vibrate your entire kayak while providing a clear sound on windy days. For such a compact speaker the bass is excellent!

The EcoRox has two mounting options which make this a superior choice in Bluetooth speakers for water sports. The integrated carabiner allows for quick clipping the speaker to a pack or bungee. In addition on the bottom of the speaker molded in is a brass 1/2-20 threaded insert allowing it to be compatible with any RAM or Yak Attack system.

RAM Mounts:

Yak Attack:

1″ Screwball with 1/2″ Mighty Bolt (For Track Mounting)

Mounting Location:

20150523_194242

Click Photo To Enlarge

If mounted close enough to the user there are a series of control buttons located on the speaker such as volume controls and track controls. Keep in mind when mounting the speaker you will want to keep it within reach to turn it on and off and control the various functions although most can be controlled by your smartphone. Another feature is you can take speaker phone calls as it includes an integrated Microphone.

The photo on the right displays mounting to a golf cart using a Medium sized Ram Tough Claw with 1″ ball. This mounting solution will allow any mounting location provided a railing or edge.


Specs from EcoXGear website:

Size & Weight

  • IPX7 Waterproof. Fully submersible in Water
  • Rugged, Waterproof and Floating Bluetooth Speaker
  • 8W (2 x 4W) Speakers
  • Top Mounted Bass Radiator
  • Connects to your Smartphones, Tablets and Laptops
  • Top Panel Control Buttons: Power, Bluetooth Pairing, Volume +/-, and Speakerphone Answer
  • Built in Battery: Lithium Rechargeable, 10 hour play or talk time (actual time varies)
  • Aux-In
  • Mounting Options via ¼ 20” Camera mount screw post
  • Height: 2.5″
  • Width: 5.3″
  • Depth: 3″
  • Weight: 11 ounces (0.6875 lbs.)

Input & Outputs

  • Micro USB Charging Jack
  • 3.5mm Aux-In Jack

Power

  • Li-Ion Rechargeable Battery
  • Over 10 hours playtime
  • Fully re-charges in 2.5 hours

For more information and photos of this speaker please see the EcoXGear website.

The Plastic Hull is not sponsored or affiliated with EcoXGear or any products they offer.

Jackson Kayak has really simplified the installation of fish finders for the end user first with the Big Rig and now with its new offshore kayak the Kraken! Like the Big Rig the Kraken is Raymarine Dragonfly ready. This means the Lowrance HDI skimmer also fits really nice in this scupper with the Lowrance Scupper Mount Kit! This article covers how to install a Lowrance skimmer transducer & Fish Finder on the Kraken in a scupper hole so the transducer is in the water.

lowrance gear

Things you will need:

Install:

First unwrap the transducer cable from its packaging and twist tie. run the wire from the hull through the scupper up to the deck . Unboxing the scupper mount simply follow the diagram. With the HDI/Chirp skimmer you will simply slide the transducer on the track at the bottom of the transducer mount. It needs to be positioned forward on the mount so slide the track all the way up to where the wire goes inside the transducer. Now Slide the foam insert and then through the top bracket that will fit perfectly to the scupper. Using the wing nut thread it all the way down to the top bracket to snug it up. Once snug you may now clip the threaded plastic off flush with the bracket and clip the cap over.

Now to run the transducer wire to the inside of the kayak.  Using a 1″ diameter hole saw drill through the radius area of the hatch. BE careful as the plastic is ver thin here. Once the hole is made runt he cable through the wire cap and screw the wire cap in using the screw driver. The screws will self tap.

Next for wiring back to the fish finder unit and battery. This is really up to you where you would like the location to be. I tend to keep it out of the way of where fishing line cannot fowl with the wires and also so adjusting the location of the fish finder on the fly. transducer install kraken finalAlso take into consideration the factory installed battery box tray between the front day hatch and the center hatch (7). In my case the fish finder location is to be on the center hatch tracks and being fully adjustable to slide the entire length of the track. The decision to run the wired through the deck in front of the center hatch in my case was the conclusion. This location allows the wires to swing and not get int he way when operating the hatch. The next step will be fabricating a track mount console that will allow me to mount the fish finder to the center of the hatch.

To connect the battery using a plug connector first slide a 3-4″ x 3/8″ diameter heat shrink tubing over the bare wire side of the Lowrance power wire. Crimp the butt connectors to the wires with the  correct polarity and heat shrink the connectors. Then slide over the 3/8″ heat shrink tubing and shrink  the connectors in. I prefer to use clear heat shrink tubing due to all of the use int he salt water. Sometimes connections fail and have water seep in. This speeds up the trouble shooting as now the corrosion is detectable visually.

transducer install kraken install

Complete!

Page 4 of 7« First...23456...Last »