Tips for Spring Cleaning your kayak:

Its nice to get out on a clean kayak the first fishing trip of the season. So once you take that tarp off or drop your boat from its storage in the garage set aside a little time to clean up the kayak. Here are some Tips for Spring Cleaning your kayak.
Some owners clean there kayaks prior to storing them which is a good idea. However some northern anglers fish until the winter weather disallows us to continue and cleaning in below freezing temps just doesn’t happen. So wheel your kayak onto your driveway hose it off and clean it up with some simple green and water. Brush or sponge off all the dried on bait and fish blood along with the dirt mud sand and any other crap that stuck there from normal fishing. When complete let dry for about a half hour.

Removing Scuffs & Scratches from your Kayak:

Spring Cleaning removing ScratchesAfter the initial cleaning personally I like to remove the small scratches and scuffs from the hull. To do this you will need a heat gun with a narrow tip. The tip will direct the heat to a smaller area which allows better control. Wait for the air to become hot 15 – 20 seconds. Spring Cleaning removing ScratchesSlowly run the heat over the scratched area until the scratches disappear and the plastic has a shiny look to it. Do not hold the heat gun in one are for long periods of time as your will risk damaging the kayak. This process will eliminate most minor scratches and will clean up deeper ones.


Replacing worn and damaged decals:

The second part of kayak clean up day was to replace the Yak Attack Nite Stripe. The stripe lasted two fishing seasons but was pretty damaged with quite a few missing spots. To remove the Nite Stripe simply using the heat gun run the heat along the decal for about 2 seconds. This will loosen the glue allowing you to simply peel off or even use a plastic scraper or an object that will not scratch and damage the kayak to remove it. Installing the replacement is simple. Just remember it should be over 60° F outside or in your garage for the adhesive to be effective.

Restoring and protecting your kayak:
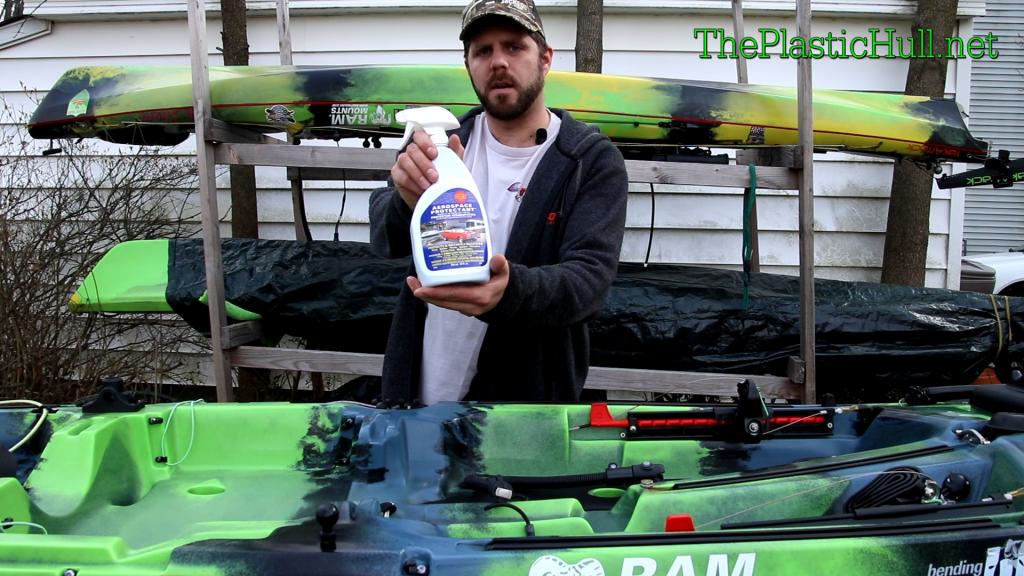
Tips CleaningSpring Cleaning UV ProtectantFinally restoring the boats color and shine. Using 303 Aerospace Protectant will protect the kayak from the UV Radiation of the sun. UV Radiation over time will deteriorate the color and will make the plastic become brittle and crack. To prevent the UV fading process #1 limit the time of exposure of your kayak to the sun. #2 Utilize 303® Aerospace Protectant™. 303 is by far the best product on the market for keeping your kayak looking new and restricting the effects of UV degradation. 303® Aerospace Protectant™ can be used on roto-molded polyethylene, ABS plastic, Vinyl, Carbon Fiber, and other plastics.

Spring Cleaning UV Protectant303 Is also water based instead of other oil based products out there which has less impact on the environment. It also can be used on your car in your home and even on Dry Suit gaskets.

It is best to reapply every 3-5 weeks for the best performance. It literally takes about 15 minutes to apply to the top of the kayak. Personally I don’t bother reapplying 303 to the bottom of the hull as my kayak rides upright all of the time and 303 on the hull makes it way too slippery on the vehicle transport rack.


Jackson Kayak Kraken Sealect Designs Trucourse Rudder System Install

Sealect Design ProductsThis article describes step by step how to installation for the Sealect Designs Tru Course rudder system and footbraces on the Jackson Kayak Kraken. The Sealect Designs Tru Course steering is an upgrade to the JK factory kit offered. The Gas Pedal style foot braces are much more comfortable to steer. This install is for both the Kraken 15.5 and the 13.5.

This install begins with a stock “Rudder Ready” Kraken kayak. The definition of “Rudder Ready” is all of the tubing for the control cables and trim line has been installed in the Jackson Kayak factory. Every Jackson Kayak fishing line boat is “Rudder Ready” from the factory. This saves a ton of time on the install not having to drill and run the tubing for the lines.


Materials and Products:

Sealect Designs Tru-Course Rudder K748150-3

Sealect Designs Tru Course Foot Braces w/ Rudder Control K747205-1

Sealect Designs Trucourse Grudgeon (Rudder Mount Bracket) K748280-1

(2) Sealect Designs Cable Adjusters K747260-1

(4) 1//4″ x 2″ long 7/8″ Hex Bolts

(4) 1/4″ Hole x 1/2″ OD x 5/8″ L Nylon Spacers

30′ Stainless 1/16″ cable rope (Local Kayak Shop)

(2) Swedges

3/8″ Heat Shrink Tubing

Nylon Stop Ball K655140-1

Bike Chain Lube

8″ Length 1/8″ Shock Chord

6 feet of 500 para-chord

Tools:hex keys

Drill

Diagonal Wire Cutters

Heavy duty pliers for crimping Swedges

Screw Drivers

3/8″ Wrench

7/8″ Wrench

Hex Keys (Some Included with kit)

Madd Skillz (Just Kidding) This is a pretty simple install/upgrade!


Install:

Click to Enlarge

Click to Enlarge


Step 1: First you will need to remove the stock foot braces. With a Philips head screw driver and a 3/8″ wrench remove the bolts and the foot braces in their entirety.


Step2-3

Click to Enlarge


Step 2: The holes drilled for the stock foot braces are 14.5″ O.C. which is the same for the new Tru-Course Footbraces. You will need to drill out the existing 1/8″ holes to 1/4″ in the deck of the kayak to accept the new hardware.

Step 3: Pop out and remove the included Tru-Course footbrace hardware. Set aside the washers and nuts. You will reuse these with the new hardware.


Click to Enlarge

Click to Enlarge


Step 4: Using 3/16″ Bungee tie a knot in one end. Feeding the un-knotted end through the hole in the back of the foot brace pedal then tying a knot in that end after passing it through the tie down point on the pedal. This will act as an auto rebound to the center position when not controlling the rudder.


Step4

Click to Enlarge


Step 5: Replace with (2) 1/4″ x 2″ long 7/8″ Hex Stainless Steel Bolts each footrace (4) total. The bolt head will counter sink with the outside of the foot brace U shaped poly brackets along with the new cable adjusters. The threaded portion will penetrate the kayak hull along with the 1/4″ Hole x 1/2″ OD x 5/8″ L Nylon Spacer on the exterior and a washer and the nylon lock nut on the inside of the hull.


foot braces installed

Click To Enlarge


Step 6: Now to run the steering cable. Feed the cable from the foot brace side through the “rudder ready” tubing to the stern of the kayak. While feeding the cable use the bike chain oil on the cable as you pass it through the tubing. This will help keep salt water and dirt out while keeping the cable sliding freely. You can also feed from the stern if it is your preference.


kraken stern bracket

Click to Enlarge

rudder and cables

Click to Enlarge


Step 7: At the stern of the kayak locate two 1/4 20 plastic screws in the molded inserts. Remove them. Using the Sealect Designs Tru-Course Bracket and the stainless 1/4-20 screws along with blue loctite fasten the bracket to the stern. The Bracket should be mounted as pictured with the longer end down.  Slide the rudder post through the horizontal holes in the bracket and secure using the split ring.


Click To Enlarge

Click To Enlarge


Step 8: On the rudder remove both plastic covers (2 small hex screws) on the rudder exposing the cable tie down point. Loosen the hex screw on the metal cable stop. Slide the cable through the hole in front of the rudder and slide under the metal plate or cable stop at a 90 degree angle so the cable points towards the back. You only need a 1/2 inch of cable beyond the plate. Tighten down on both sides.


foot brace pinned

Click To Enlarge


Step 9: Back at the foot braces using the included hex key locate a small hole on the face of the foot pedal. Slide the hex key into the hole with the pedal in the upright position find where the key slides in holding the pedal in place. This will be the center position.


Click To Enlarge

Click To Enlarge


Step 10: Loosen the grooved guide at the top of the pedal enough to accept the cable. From the stern run the cable through the guide counter clockwise front then to the back through the groove and under running the cable through the adjuster. Now tighten the top guide.


loop and swedge

Click To Enlarge


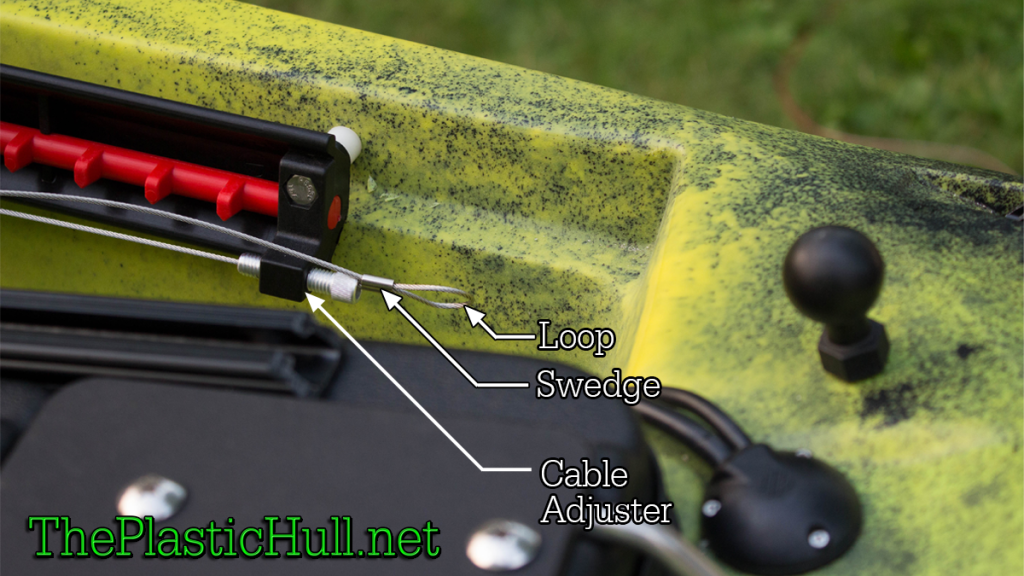
Step 11:  Thread the cable adjuster almost all of the way in. Pulling the cable tight using a swedge make a loop and crimp. Cut the excess cable.

(Sealect Designs prefers to install with the cable swedged or terminated at the footbrace first at the cable adjuster then aligning the rudder and terminating the cable at the rudder.) This is your preference as i have found both ways are as good.


Step 12: Repeat steps 9-11 on the adjacent side.

trim line at rudder

Click To Enlarge


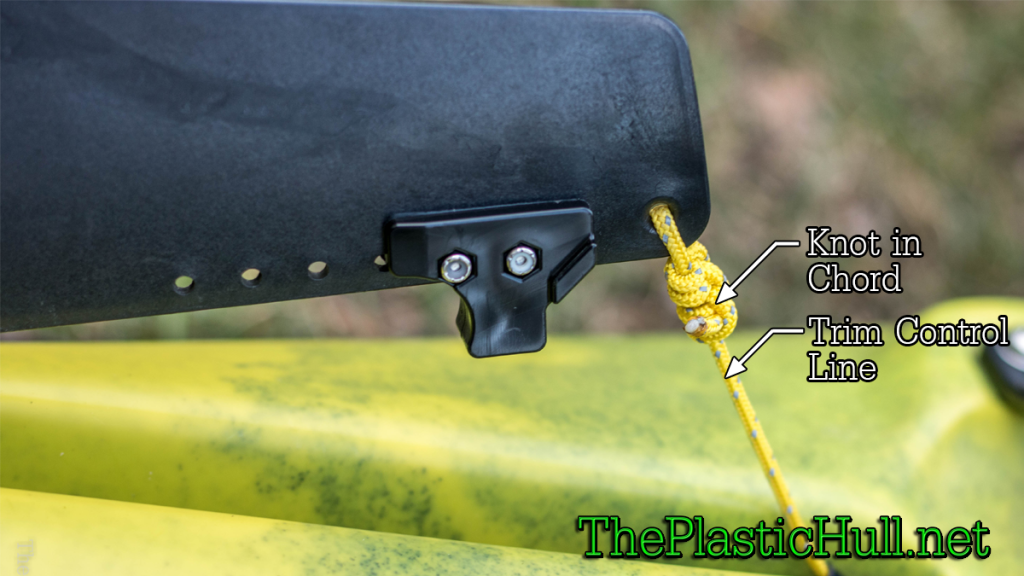
Step 13: Run the para-chord from the starboard trim control location. There is factory installed tubing that runs to the stern at the rudder. Tie the trim line to the hole at the top of the Tru-Course Rudder foil.


Trim cockpit

Click To Enlarge


Step 14: At the trim control location slide the trim stop ball onto the para-chord pull the rudder into the trip up position. You do not want the rudder to be parallel to the kayak let it be on a 30 degree angle. This will allow the rudder to trim down automatically. If tied down to tight the rudder may not deploy easily. Tie a loop in the end of the trim line around the J hook to secure.


This completes the Sealect Designs Tru-Course rudder install on the Jackson Kayak Kraken. Good luck, this was the best upgrade to the Kraken I have experienced! Much better turning of the boat keeping her straight in the wind top of the line rudder control and the most comfortable setup out there! The kayak was made for it!

Check out SealectDesigns.com for a local dealer with the dealer locator or call for availability! Phone Ryan at 425-252-2149 and let him know The Plastic Hull sent ya!!

Camera Float Life Proof Phone Case Tether

camera float

So you purchased a Life Proof case for your phone Now its protected and waterproof! Only problem if you drop it overboard it will sink like a rock. I came up with a simple solution the use of a GoPro tether and a camera float.

tether partsGoPro has a 3M sticky back tether product used to tether a GoPro to helmets and surf boards and such. The 3M adhesive is very sticky and will just about stick to anything.

How to install. Simply stick the tether to the back of your phone. In an area that will not interfere with phone mounts. After this installation the phone will not sit flat but its better than loosing it.

tether complete

You can find the GoPro Tether on Ebay!

Also find the Floating Camera Strap Here!

Page 6 of 12« First...4567810...Last »