Want to extend the run time of your kayak electronics for longer fishing trips or tournaments? This article focuses on How To Connect 12V Batteries in Parallel. This can be easily acquired with the addition of a second SLA or LFP battery (LiFePO4) wired parallel. The second battery will need to be the same voltage as the first or they will work against each other which may result in heat issues or decreased run time. Also if you are using a SLA you must use the same type of battery in parallel due to the voltage issue.

You can create a parallel connection between 2 batteries with a few materials simply right at home.

Kayak Battery Box Layout

Materials needed:

  • (4) Female Spade Crimp On Connectors
  • (2) 18″ length – 14 AWG Copper stranded wire w/ insulation Red & Black
  • (2) Butt Connectors (optional)
  • Fuse Block or Inline Fuse
  • Blade Fuses

Tools:

  • Wire strippers/crimps
  • Heat Gun

Fabricating a Parallel Wire Harness:

Parallel Battery Wiring DiagramMost small 12v batteries have male spade connectors on the top as battery terminals. Although some have other connectors its best to match them so you may disconnect the battery from the harness. Since the battery harness will be used in a wet marine environment its best to use marine grade heat shrink connectors.

The parallel harness will simply connect two batteries together on the same polarity. Positive to Positive and Negative to Negative. Seen in the diagram on the left, you will to wire in an inline fuse or fuse block on the positive side. Then adding a latching switch adds safety while plugging and unplugging devices around water.

If using an inline fuse the switch can be spliced in after. If using a fuse block a switch can be added before the block as a master switch.  Also you may want a switch to control power to every accessory. In that case switch all positive leads from the fuse block. This comes in handy when running say lighting and a fish finder. Separate switches will operate each electrical device.

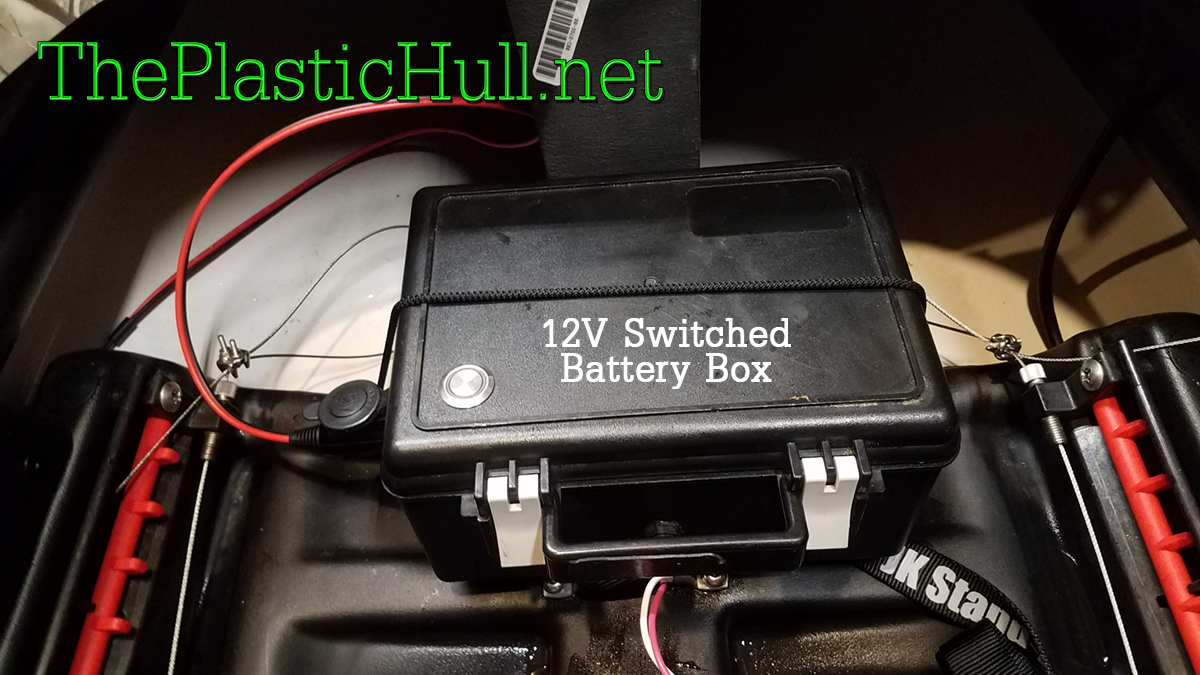
My Parallel Battery Project includes (2) 12V 12 aH LFP (LiFePO4) batteries. When completed total output will be 12V 24aH. This will extend the run time of the battery but will still power the same electronics.

For building the battery box check out my post: Portable Water Resistant Enclosure & Switching 

Portable Power Charging Station


If you have owned a sit inside or hybrid kayak you understand how hard it is to drain water out of it. Especially when its on the roof of your truck full from the rain or out on open water taking waves over the bow. An electric bilge pump is a inexpensive answer to the problem. This article focuses on installing an electric kayak bilge pump inside a Jackson Kilroy LT but can be modified to work with any sit inside style kayak.

Pump & Hose w/ fitting kit


Materials:

Tools:


Install:

One of the simpler install on the Kilroy the electric bilge pump should only take 15 minutes to install. The bilge pump location I chose is in front of the stern bulkhead.  This location is idea because tilting the kayak bow up the water will collect here. Being one of the flattest accessible areas will allow the most water to be pumped from the inside deck.

Kayak Electric Bilge Pump - Attach pump housing to kayak bulkhead


Remove the strainer from the bottom of the pump. Using the silicone spread it on the flat mounting area of the bracket. Firmly press against the hull push it so it adheres to the bulkhead wall. Let dry overnight.

1" Hole DrilledClip pump into housing bracket. Connect tube to outlet of pump. Choose a location for the 3/4″ Thru-Hull fitting. Make sure the location is above where the waterline of the kayak fully loaded would be. It is important the mounting area should be flat but angle away from the kayak. Mark the desired location and drill a 1″ hole.


Measure the distance to your chosen exit location. With a razor blade cut the tubing leaving some slack. Connect the end to the Thru-Hull fitting and tighten down hose clamps snug.

Wiring Electric Bilge Pump:

Using 2 butt connectors each splice and a 3″ piece of 1/2″ adhesive heat shrink tubing connect the 5′ length of 2 stranded wire to the 12v disconnect. Connect black to black and red to red. Crimp on the butt connectors with a heat gun shrink the ends to the wire. Do the same for the pump leads on the other end of the disconnect and the 12V power plug. Add a dab of Dielectric Grease to each connection on the disconnect plug to fight corrosion and keep it maintained for easy removal. Once the wiring is completed you will mount the disconnect and wires out of the way. This is the storage area of the Kilroy. The less things to snag on is best. I used Cable Tie Mounts and wire ties to hang the wire up under the cockpit lip out of the way.

Bilge Pump Connected to Battery Box in Cockpit of KayakBattery Connection:

My battery box is set up with a 12V cigarette lighter plug. It is your preference whichever type of connector you would like to connect to the battery! I’m going to see how this works out for now. Maybe add separate switch on the battery box to control the on/off of the cigarette lighter receptacle.


Disclaimer:
Installing hardware may cause damage and/or void manufacturer warranties.  ThePlasticHull.net its authors or any other source of information on this website is in no way responsible for your actions nor any type issues or damage that may occur.  The information provided on this website is a free reference guide only. The authors of all information, sponsors and the owners of the website that host this information are not liable for any problems or issues that arise from the use of this information. Users of this information hereby acknowledge that all use of this information is done by their own free will, at their own sole risk, understanding that destruction of property, injury, or death could occur.

Torqeedo Ultralight Error Codes

Error Code Description & Possible Fix
E02 Motor overheated Motor can be used again after a short wait (about 10 minutes). Contact Torqeedo Service.
E03 Motor tipped during operation Motor can be used again after tipping it down and pressing on/ off.
E04 Move command with tipped motor The engine can be driven again after tilting from the stop position.
E05 Motor/propeller blocked Separate motor cable from battery. Loosen blockage and turn propeller one revolution by hand. Insert motor cable again.
E06 Voltage in the motor too low Low battery charging status. Motor can be used again slowly from the stop position.
E07 Motor over current Continue at low output. Contact Torqeedo Service.
E08 Circuit board overheating Motor can be used again after a short wait about 10 minutes). Contact Torqeedo Service.
E21 Remote throttle calibration defective • Re-calibrate: Press “cal” button for 10 seconds. • The display shows “cal up”: Press remote throttle lever forward to full gas then press the “cal” button. • The display shows “cal stp”: Return remote throttle lever to central (stop) position then press the “cal” button. • The display shows “cal dn”: Press remote throttle lever reverse to full gas then press the “cal” button.
E22 Magnetic sensor defective Re-calibrate (refer to E21).
E23 Value range false Re-calibrate (refer to E21).
E30 Motor communication error Check the motor cable’s plug-in connection. Check the motor cable for damage.
E32 Remote throttle communication error Check the remote throttle‘s connections. Check the cable.
E33 Internal error • Overcurrent of 5V bus/-USB supply – > Check cable of tiller/remote throttle, remove additional devices such as TorqTrac and USB connection, and switch system on/off. • Error is displayed immediately after turning on the battery and can be reset by the tiller / the remote throttle. -> Parameter error, error in the EEPROM. Contact the Torqeedo Service Center.
E36 Overvoltage battery/ engine For external drive (towing the boat, sailing, operating with another engine), the propeller is to be taken out of the water. If the error occurs during/after charging the battery contact the Torqeedo Service Center.
E41 Excessive charging voltage / charging current too high If the error occurs despite the use of a Torqeedo power supply, contact the Torqeedo Service Center.
E42 Power fuse defective Battery only starts when charging cable is plugged in. Contact Torqeedo Service Center.
E43 Battery empty Charge battery. Motor can be used again slowly from the stop position.
E45 Battery overcurrent Switch motor off and on again. If this error occurs the battery status indicator and range display can no longer operate until the battery has been fully charged again.
E46 Battery operating tempe- rature fault Battery cells outside operating temperature between -20°C and +60°C (-4°F and +140°F). The motor can be used again when the temperature has stabilized.
E48 Charging temperature error Allow battery to cool; charging will continue when the cell temperature is between 0°C and +45°C (32°F and 113°F).
E49 Battery is exhaustively discharged Contact Torqeedo Service Center. Other error codes Faulty Contact Torqeedo Service and notify them of the error code. Nothing displayed/ no flashing during charging Battery does not charge Contact Torqeedo Service Center.

The Plastic Hull is not affiliated with Torqeedo. Please contact Torqeedo service_usa@torqeedo.com regarding warranty or repair service.