Lowrance Elite 5 TI TotalScan Kayak Install for Jackson Kayak Big Rig

TS_DimensionsLuckily the Jackson Kayak Big Rig has factory molded scuppers that accept large transducers like the Raymarine Dragonfly. Although the Lowrance Elite 5 TI TotalScan transducer is over 10″ long it mounts in pretty flush on the Jackson Kayak Big Rig with some modifications.

TotalScan Kayak Scupper Transducer Install & Mods:

xducer diagramI had to flip the mounting bracket upside down then mount the transducer to bracket. This allowed an extra 1/4″ of space so the transducer mounted closer to the hull and more flush inside the scupper trough.

Transducer mounting bracket cable notch modification. (Optional)

I opted to notch out the mounting bracket to receive the transducer cable flush. Doing this allowed me to install the transducer with the wire forward. I figured the less exposed cable the more protected it would be to objects in the water damaging it. Simply I marked with a sharpie marker the center and width of the cable. Using a vise and an angle grinder to notch in a space for the cable to pass through.

scupper mount with bracket

Using the Lowrance Kayak Scupper Mounting Kit. With a simple modification using a bolt and about 6 washers you can pack out the middle of the bracket to sit flush on the transom bracket. See the image below.


A Big Rig application.

To secure the transducer so it will not move at all add bungee to hold cantilevered end taught to the hull.The bungee will pass through the scupper behind the actual mounting plate. Using a scrap piece of plastic drill with a hole saw to create a tie down plug. Then pass through the bungee and tie a knot this will hold the transducer taught in the scupper. I ran the new transducer wire through the same thru hull holes as the HDI skimmer location.

scupper mounting

Scupper_Mounted_TotalScan


Waterproof Kayak Battery Box Mods & Upgrades

batt_box_finishedThis article illustrates how to modify and wire a 12V plug port and a USB receptacle for charging electronic devices such as cell phones and running GoPro’s with out an internal battery for an all day charge. Using the existing waterproof battery box from a previous article we will first replace the 12V 12 aH Sealed Lead Acid (SLA) Battery. See SLA or LFP Accessory Battery for your Kayak write up for the differences in batteries and pros/cons of both. I have opted to now use a LFP battery for its long list of great qualities.

Products & materials you will need.

Battery Box Wiring Diagram

Wiring Diagram 8X11

Instructions:


  • hole ocationsFirst thing you will do is remove the existing battery and all of the wiring in the box. We are going to replace everything inside. Keep the cable gland as it will be reused.
  • Using a hole saw drill match up the diameter to the outside of the hole saw with the two receptacles. Try to keep the holes even and equal distance apart for aesthetic reasons. After drilling the holes trim the excess from the edge of the holes. Set the receptacles and tighten the collar down.
  • Drill a hole using a hole saw that matches the diameter of the switch in your desired location. Make sure the internal protrusion will not interfere with the battery or the 12V receptacles. Install the switch.
  • battery box portsNow we will splice 2 wires together to connect the negative side and the positive sides of the receptacles together. Make one for each RED and BLACK.
  • Connect the spade connectors to the correct terminals on the receptacles + with + and – with -.


  • Using a butt connector connect the RED + wire from the Fish Finder Plug to one inline fuse.
  • Using the 3 Way Female to 2 Male connector connect the Two Inline Fuses to the Male ends and the White 12V Positive from the switch with a male spade to the female end on the 3 way its good to tape this connection with electrical tape or purchase a insulated connector.
  • Connect the Red + wire from the switch using a female spade connector to the battery.
  • battery box wiredConnect the BLACK – wires by crimping on a female spade connector from the 12V receptacles, the 12V Fish Finder connection and the black wire from the switch together. Simply twist the (3) wires together feed into the hole on the connector and crimp using the crimping tool.
  • Then Connect the Female Spade with the (3) black wires to the – Negative side of the battery.


Upon Completion:

Test by pressing the switch to the ON position. The LED Indicator should light up. Test all receptacles and that the fish finder powers up. You now have a portable waterproof kayak battery box with the option to run additional lighting on your kayak, Charge electronics, and run cameras VIA USB power.


This concludes the Kayak Battery Box modifications & Upgrades article. Please leave comments on your thoughts!


SLA or LFP Accessory Battery for your Kayak

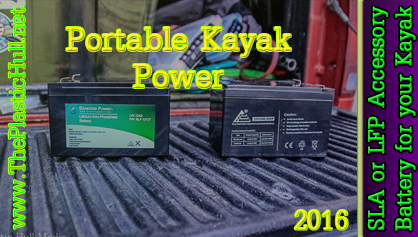
IMG_6064In a short period of time Fishing kayaks in most cases a single user vessel have begun using many of the electronics that power boats use. Portable power has become a necessity. Running Fish Finders on a battery pack of AA batteries is a thing of the past. In the present we have Fish Finder/Chart Plotter combos, kayak lighting, and  the ability to charge battery powered devices while away from home is important.

Previously we built a waterproof battery box for a fish-finder/chart plotter. Since then there have been many advancements in batteries. This article explains the difference between the traditional Sealed Lead Acid Battery (SLA) and the latest Lithium-iron-phosphate battery (LFP). Here I list the pros and cons of both. You make the decision!


A SLA battery

SLA Battery Pros:

  • Inexpensive (Economically Friendly)
  • Fully Sealed Package
  • Rechargeable
  • Recyclable

SLA Battery Cons:

  • Poor weight-to-energy (8 lbs 12aH)
  • Cannot be stored in a discharged condition
  • Inconstant discharge voltage
  • Limited number of full discharge cycles
  • Lifespan (300 charge cycles)
  • Sulfation
  • Memory
  • Not Environmentally Friendly
  • Contains Lead

IMG_6141There are many cons to the SLA battery for use on a kayak the first being weight. The 12aH SLA will weigh in at 8 lbs. That’s a lot of weight to travel with on any kayak. Battery life is another issue you may get a season or two total out of the lifespan.

New and improved Lithium-iron-phosphate batteries (LiFePO4 or LFP) are slowly replacing Traditional SLA batteries. Although still pricey LFP batteries have many advantages over the previous generation technology of SLA’s.

LFP Battery Pros:

  • Excellent Weight-to-energy (3.5 lbs 12aH)
  • Very constant discharge voltage
  • Low Discharge Rate compared to SLA
  • Rechargeable
  • No Memory (Can Be fully Discharged without cell damage)
  • Lifespan (2000+ charge cycles 5-10+ years)
  • Recyclable
  • Thermal and chemical stable aka Safer (as opposed to Lithium Ion cells)
  • No Environmental Thermal concerns (provides maximum output at hot or cold temps)

LiFePO4 Battery Cons:

  • Cost (Expensive)
  • Contains Phosphates

Looking forward to this conversion. Will report on the experience in the near future.


Page 2 of 41234