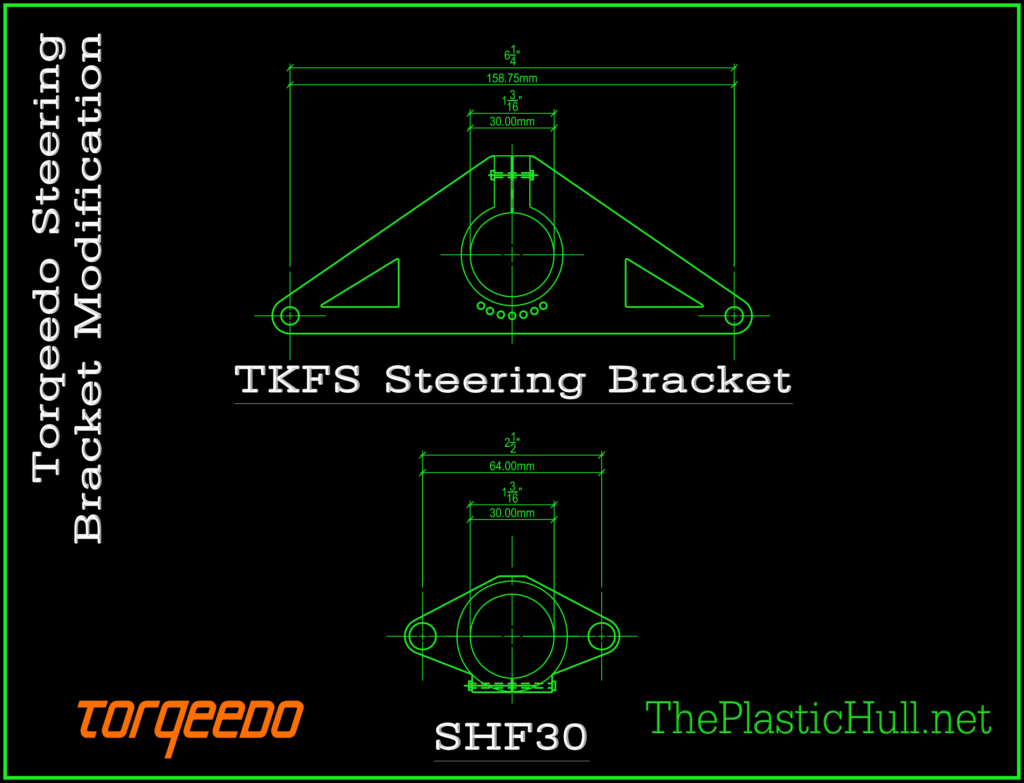
The TKFS aluminum steering bracket was an excellent alternative to the stock bracket but it lacked the steering control that I always wanted. Shortening the diameter of the steering bracket was key to enabling the ability to turn quickly. Though motoring a kayak on the water you will never turn on a dime. This modification makes it pretty close! Torqeedo Full Range Steering Mod was a much awaited for idea that I finally put into motion.

My list of expectations are as follows:

  1. Narrower turning radius
  2. Additional responsive  steering
  3. Increased Speeds in forward operation (longer upper boom)


TKFS and Replacement Steering Bracket Graphic


Torqeedo Full Range Steering Mod Application:

Tested and working the new mod allows the Ultralight 403 to make very responsive tight turns with less motion of the steering foot braces. The full range of motion covers 180 degree pivot of the pylon.  The DIY mod consists of a Aluminum SHF30 30mm Flanged Shaft Support Block which replaces the stock steering bracket or TKFS Aluminum aftermarket bracket.
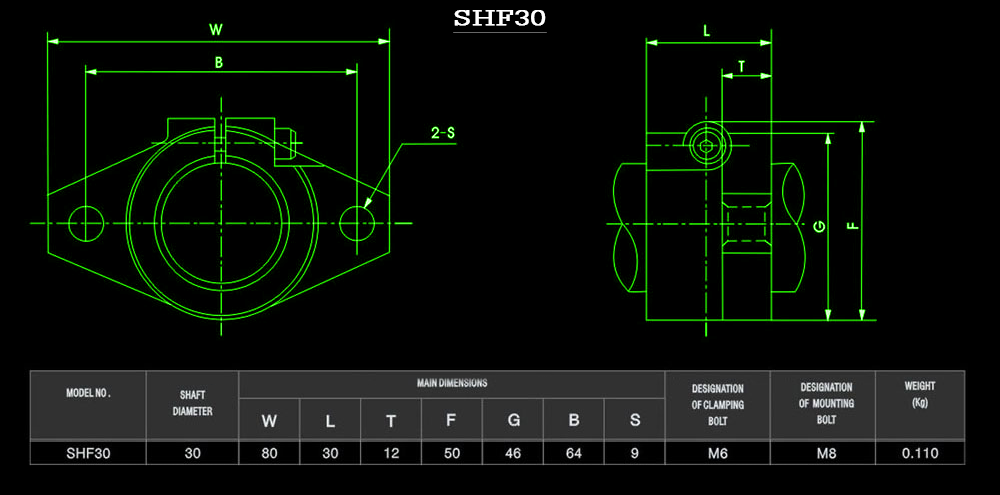
Torqeedo Full Range Steering Mod

Parts Needed:

Aluminum SHF30 30mm Flanged Shaft Support Block

5/16″ x 3″ Stainless Steel Eye Bolt

5/16″ Nyloc Nut

(2) SS 1/4″ Fender Washers

(1) SS 1/4″ Lock Washer

Marine Grade Anti-Seize

Tools Required:

(2) 1/2-Inch Combination Box-End Open-End Wrench

5mm T-Handle Ball-Hex Key


Installation:

Using the narrower bracket I had to relocate my steering cables to come straight out the stern. Previously I had them routed out the sides of the stern. This made a perpendicular connection to the previous TKFS steering cable links. Its important to have them as perpendicular as possible to acquire the full range of motion.

I used two Eye Bolts with the intent of connecting the steering cable carabiners to the eyes themselves. Upon setting that up I noticed the carabiners wanted to flip around the Eye. This created a clicking noise. Connecting the carabiners to the shaft of the bolt itself solved this issue. The eye has enough of a diameter the carabiners wont slip off. When installing the eye bolts be sure to coat the threads with marine grade anti seize.


Along with this modification I added a longer upper boom. I had one laying around the garage. Gaining distance between the pylon and the kayak changes the turning pivot point. This should result in a smaller radius turn. The additional distance gained was 9″ over the stock upper boom. If you refer back to my Torqeedo Modifications Video this was the reason I left 12″ of extra steering cable up at the foot braces.

The Test:

The new modification passed the testing phase with all expectations met. The steering is much more responsive. With the 180 degree added range of motion the kayak turns much faster. With the faster turning the kayak still remains stable. Additional turning response is also present while in reverse.

From my list of expectations outlined above #1 & #2 have been accomplished. I however did not notice much of an increase of speed on the Kilroy LT with the longer upper boom installed. However this does help narrow the overall turning radius.


I believe you will enjoy this mod which works along with the Sea-lect Designs Tru-Course foot brace steering system. It is a huge improvement over the longer steering bracket!

Disclaimer:
Installing hardware may cause damage and/or void manufacturer warranties.  ThePlasticHull.net its authors or any other source of information on this website is in no way responsible for your actions nor any type issues or damage that may occur.  The information provided on this website is a free reference guide only. The authors of all information, sponsors and the owners of the website that host this information are not liable for any problems or issues that arise from the use of this information. Users of this information hereby acknowledge that all use of this information is done by their own free will, at their own sole risk, understanding that destruction of property, injury, or death could occur.


Jackson Kayak Kraken Sealect Designs Trucourse Rudder System Install

Sealect Design ProductsThis article describes step by step how to installation for the Sealect Designs Tru Course rudder system and footbraces on the Jackson Kayak Kraken. The Sealect Designs Tru Course steering is an upgrade to the JK factory kit offered. The Gas Pedal style foot braces are much more comfortable to steer. This install is for both the Kraken 15.5 and the 13.5.

This install begins with a stock “Rudder Ready” Kraken kayak. The definition of “Rudder Ready” is all of the tubing for the control cables and trim line has been installed in the Jackson Kayak factory. Every Jackson Kayak fishing line boat is “Rudder Ready” from the factory. This saves a ton of time on the install not having to drill and run the tubing for the lines.


Materials and Products:

Sealect Designs Tru-Course Rudder K748150-3

Sealect Designs Tru Course Foot Braces w/ Rudder Control K747205-1

Sealect Designs Trucourse Grudgeon (Rudder Mount Bracket) K748280-1

(2) Sealect Designs Cable Adjusters K747260-1

(4) 1//4″ x 2″ long 7/8″ Hex Bolts

(4) 1/4″ Hole x 1/2″ OD x 5/8″ L Nylon Spacers

30′ Stainless 1/16″ cable rope (Local Kayak Shop)

(2) Swedges

3/8″ Heat Shrink Tubing

Nylon Stop Ball K655140-1

Bike Chain Lube

8″ Length 1/8″ Shock Chord

6 feet of 500 para-chord

Tools:hex keys

Drill

Diagonal Wire Cutters

Heavy duty pliers for crimping Swedges

Screw Drivers

3/8″ Wrench

7/8″ Wrench

Hex Keys (Some Included with kit)

Madd Skillz (Just Kidding) This is a pretty simple install/upgrade!


Install:

Click to Enlarge

Click to Enlarge


Step 1: First you will need to remove the stock foot braces. With a Philips head screw driver and a 3/8″ wrench remove the bolts and the foot braces in their entirety.


Step2-3

Click to Enlarge


Step 2: The holes drilled for the stock foot braces are 14.5″ O.C. which is the same for the new Tru-Course Footbraces. You will need to drill out the existing 1/8″ holes to 1/4″ in the deck of the kayak to accept the new hardware.

Step 3: Pop out and remove the included Tru-Course footbrace hardware. Set aside the washers and nuts. You will reuse these with the new hardware.


Click to Enlarge

Click to Enlarge


Step 4: Using 3/16″ Bungee tie a knot in one end. Feeding the un-knotted end through the hole in the back of the foot brace pedal then tying a knot in that end after passing it through the tie down point on the pedal. This will act as an auto rebound to the center position when not controlling the rudder.


Step4

Click to Enlarge


Step 5: Replace with (2) 1/4″ x 2″ long 7/8″ Hex Stainless Steel Bolts each footrace (4) total. The bolt head will counter sink with the outside of the foot brace U shaped poly brackets along with the new cable adjusters. The threaded portion will penetrate the kayak hull along with the 1/4″ Hole x 1/2″ OD x 5/8″ L Nylon Spacer on the exterior and a washer and the nylon lock nut on the inside of the hull.


foot braces installed

Click To Enlarge


Step 6: Now to run the steering cable. Feed the cable from the foot brace side through the “rudder ready” tubing to the stern of the kayak. While feeding the cable use the bike chain oil on the cable as you pass it through the tubing. This will help keep salt water and dirt out while keeping the cable sliding freely. You can also feed from the stern if it is your preference.


kraken stern bracket

Click to Enlarge

rudder and cables

Click to Enlarge


Step 7: At the stern of the kayak locate two 1/4 20 plastic screws in the molded inserts. Remove them. Using the Sealect Designs Tru-Course Bracket and the stainless 1/4-20 screws along with blue loctite fasten the bracket to the stern. The Bracket should be mounted as pictured with the longer end down.  Slide the rudder post through the horizontal holes in the bracket and secure using the split ring.


Click To Enlarge

Click To Enlarge


Step 8: On the rudder remove both plastic covers (2 small hex screws) on the rudder exposing the cable tie down point. Loosen the hex screw on the metal cable stop. Slide the cable through the hole in front of the rudder and slide under the metal plate or cable stop at a 90 degree angle so the cable points towards the back. You only need a 1/2 inch of cable beyond the plate. Tighten down on both sides.


foot brace pinned

Click To Enlarge


Step 9: Back at the foot braces using the included hex key locate a small hole on the face of the foot pedal. Slide the hex key into the hole with the pedal in the upright position find where the key slides in holding the pedal in place. This will be the center position.


Click To Enlarge

Click To Enlarge


Step 10: Loosen the grooved guide at the top of the pedal enough to accept the cable. From the stern run the cable through the guide counter clockwise front then to the back through the groove and under running the cable through the adjuster. Now tighten the top guide.


loop and swedge

Click To Enlarge


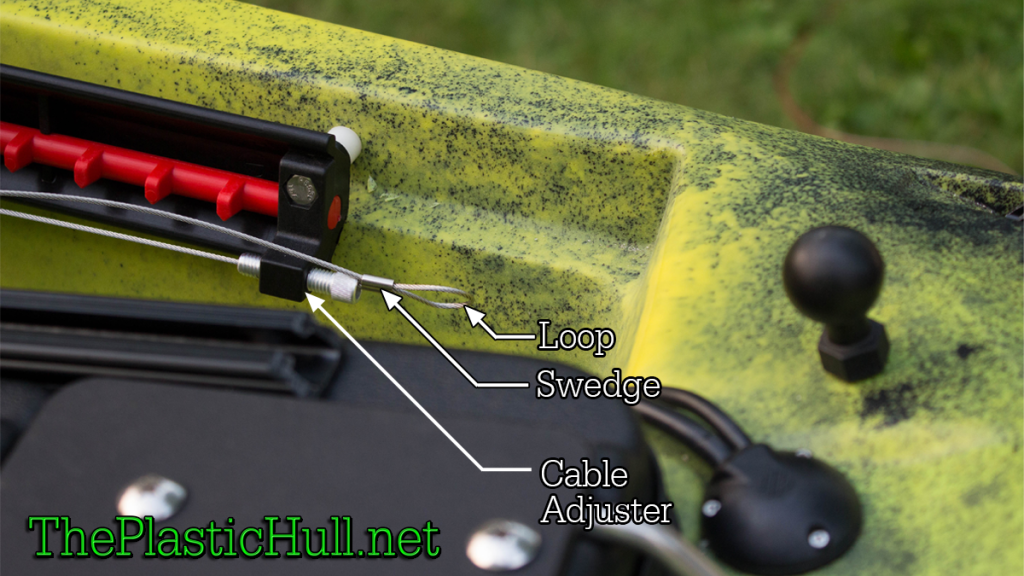
Step 11:  Thread the cable adjuster almost all of the way in. Pulling the cable tight using a swedge make a loop and crimp. Cut the excess cable.

(Sealect Designs prefers to install with the cable swedged or terminated at the footbrace first at the cable adjuster then aligning the rudder and terminating the cable at the rudder.) This is your preference as i have found both ways are as good.


Step 12: Repeat steps 9-11 on the adjacent side.

trim line at rudder

Click To Enlarge


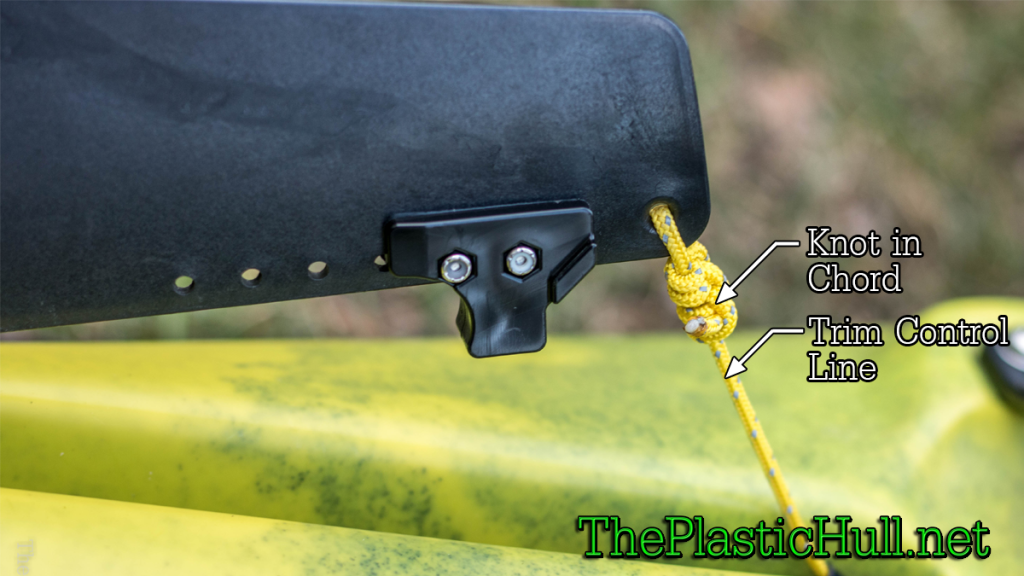
Step 13: Run the para-chord from the starboard trim control location. There is factory installed tubing that runs to the stern at the rudder. Tie the trim line to the hole at the top of the Tru-Course Rudder foil.


Trim cockpit

Click To Enlarge


Step 14: At the trim control location slide the trim stop ball onto the para-chord pull the rudder into the trip up position. You do not want the rudder to be parallel to the kayak let it be on a 30 degree angle. This will allow the rudder to trim down automatically. If tied down to tight the rudder may not deploy easily. Tie a loop in the end of the trim line around the J hook to secure.


This completes the Sealect Designs Tru-Course rudder install on the Jackson Kayak Kraken. Good luck, this was the best upgrade to the Kraken I have experienced! Much better turning of the boat keeping her straight in the wind top of the line rudder control and the most comfortable setup out there! The kayak was made for it!

Check out SealectDesigns.com for a local dealer with the dealer locator or call for availability! Phone Ryan at 425-252-2149 and let him know The Plastic Hull sent ya!!

How To: Upgrade Steering on the Big Rig

This particular install replaces the Jackson Factory installed Smart Track foot brace steering system. This article explains how to upgrade the steering on the Big Rig utilizing the Sea-lect Designs Toe Pilot foot braces. Using The Toe Pilot system you will simply angle the pedals like you would press a gas or brake pedal on a car to steer the rudder or electric motor. This eliminates the entire track sliding and one knee bent and one straight. Your entire day of fishing will be much more comfortable after this upgrade!

Illustrated in the video this upgrade is a semi advanced install but not an extremely difficult one. This upgrade will also work with the big rig stock Tru-Course rudder. This install conforms to the Torqeedo Ultralight 403 motor steering.

If your big rig does not have a steering kit factory installed Sea-lect Designs does manufacture a full Thru Hull Tru Course Rudder Kit which includes the toe pilot foot braces. The additional part if the install will be running the rudder cable tubing through the kayak.

Video of the install!

This article is the install breakdown and How To.

Tools Needed for full install:

  • 3/8″ socket
  • 1/4″ Ratchet
  • 3/8″ Open end box wrench
  • Short Philips head screwdriver
  • Hex Key Set
  • Pry Tool
  • Drill
  • Drill Bits
  • Diagonal Wire Cutters
  • Needle Nose Pliers
  • Heat Gun
  • Razor Blade

Parts & Materials Needed:

  • Sea-Lect Designs Toe Pilot Foot Braces K747205-1
  • Sea-Lect Designs Cable Adjusters K747260-1
  • 30 feet of stainless steel rudder cable
  • Heat Shrink Tubing
  • 8 Swedges or Cable Crimps
  • Lexel or Marine Goop
  • 2 9″ Lengths of 3/16″ Bungee Chord
  • #10 x 24 1 1/4″ Long Philips head bolt (Hardware Store)
  • #10 Washer (Hardware Store)

For Torqeedo Setup:

  • 3/16″ Carabeners with eye

Install Instructions:

Removing Existing Smart track System Foot Braces Start with the front bolt. Using a 3/8″ socket with a 1/4″ drive and a Short Philips head screw drive remove the thru hull nut and bolt . Slide the foot brace forward to reveal the rear screw. Now remove the it with a Philips head screw driver. Slide off the back plate and now remove the cable from the foot brace using the 3/8″ socket. Cut the terminal connector from the end of the cable and remove the cable from the stern leaving the tubing in place.

Now you will need to remove the rivet that holds the cable tubing in place as it is int he area of where the new track will be installed. Using a drill bit drill out the center of the rivet until the flange falls off. The back portion of the rivet will fall inside the hull. Patch this hole using a plastic weld or Lexel caulk adhesive.Track (2)Now using the #10 X 24 – 1 1/4″ bolt and #10 washer dab a drop of thread lock then fasten the left track to the right side of the kayak to the threaded insert. This will allow you to align the track and drill the new front hole. Once the hole is drilled using the #10 x 24 – 1″ bolt washer and nut fasten securely to the kayak.  The tracks have to be installed upside down in order to reuse the threaded insert. If you would like to mount the tracks the intended way you will need a rigging bullet as it is impossible to reach the rear area of the track to fasten with a thru bolt.

Now once the track is installed repeat the same steps on  the opposite side.

To run the cable.

Run the cable through the cable adjuster first then under the pedal is a hole run through the hole front to back then wrap it around in the groove then through the metal adjuster pulley at the top and then back to the rudder cable tubing which you will then run the cable through to the stern of the kayak. The cable wraps around the toe pilot like an ‘S’ pattern shape.

Once at the stern you will now connect the cable to your factory installed Tru-Course Rudder or in this cast to the Torqeedo steering bracket. Make sure the rudder or motor is centered at the same time the Toe Pilot pedal should be at 90 degrees to the kayak deck. This is to be center for both sides.

Now terminate the end at the cable adjuster by looping the cable through (2) swedges and crimping. Remove the tag end of cable using the diagonal wire cutters. Slide heat shrink tubing over and heat to protect the cut end and the swedges.

Refer to the image above for completed install.

Disclaimer:

Installing hardware may cause damage and/or void manufacturer warranties.  ThePlasticHull.net its authors or any other source of information on this website is in no way responsible for your actions nor any type issues or damage that may occur.  The information provided on this website is a free reference guide only. The authors of all information, sponsors and the owners of the website that host this information are not liable for any problems or issues that arise from the use of this information. Users of this information hereby acknowledge that all use of this information is done by their own free will, at their own sole risk, understanding that destruction of property, injury, or death could occur.