Jackson Kayak Kraken Sealect Designs Trucourse Rudder System Install
 This article describes step by step how to installation for the Sealect Designs Tru Course rudder system and footbraces on the Jackson Kayak Kraken. The Sealect Designs Tru Course steering is an upgrade to the JK factory kit offered. The Gas Pedal style foot braces are much more comfortable to steer. This install is for both the Kraken 15.5 and the 13.5.
This install begins with a stock “Rudder Ready” Kraken kayak. The definition of “Rudder Ready” is all of the tubing for the control cables and trim line has been installed in the Jackson Kayak factory. Every Jackson Kayak fishing line boat is “Rudder Ready” from the factory. This saves a ton of time on the install not having to drill and run the tubing for the lines.
Materials and Products:
Sealect Designs Tru-Course Rudder K748150-3
Sealect Designs Tru Course Foot Braces w/ Rudder Control K747205-1
Sealect Designs Trucourse Grudgeon (Rudder Mount Bracket) K748280-1
(2) Sealect Designs Cable Adjusters K747260-1
(4) 1//4″ x 2″ long 7/8″ Hex Bolts
(4) 1/4″ Hole x 1/2″ OD x 5/8″ L Nylon Spacers
30′ Stainless 1/16″ cable rope (Local Kayak Shop)
(2) Swedges
3/8″ Heat Shrink Tubing
Nylon Stop Ball K655140-1
Bike Chain Lube
8″ Length 1/8″ Shock Chord
6 feet of 500 para-chord
Tools:
Drill
Diagonal Wire Cutters
Heavy duty pliers for crimping Swedges
Screw Drivers
3/8″ Wrench
7/8″ Wrench
Hex Keys (Some Included with kit)
Madd Skillz (Just Kidding) This is a pretty simple install/upgrade!
Install:

Click to Enlarge
Step 1: First you will need to remove the stock foot braces. With a Philips head screw driver and a 3/8″ wrench remove the bolts and the foot braces in their entirety.

Click to Enlarge
Step 2: The holes drilled for the stock foot braces are 14.5″ O.C. which is the same for the new Tru-Course Footbraces. You will need to drill out the existing 1/8″ holes to 1/4″ in the deck of the kayak to accept the new hardware.
Step 3: Pop out and remove the included Tru-Course footbrace hardware. Set aside the washers and nuts. You will reuse these with the new hardware.

Click to Enlarge
Step 4: Using 3/16″ Bungee tie a knot in one end. Feeding the un-knotted end through the hole in the back of the foot brace pedal then tying a knot in that end after passing it through the tie down point on the pedal. This will act as an auto rebound to the center position when not controlling the rudder.

Click to Enlarge
Step 5: Replace with (2) 1/4″ x 2″ long 7/8″ Hex Stainless Steel Bolts each footrace (4) total. The bolt head will counter sink with the outside of the foot brace U shaped poly brackets along with the new cable adjusters. The threaded portion will penetrate the kayak hull along with the 1/4″ Hole x 1/2″ OD x 5/8″ L Nylon Spacer on the exterior and a washer and the nylon lock nut on the inside of the hull.

Click To Enlarge
Step 6: Now to run the steering cable. Feed the cable from the foot brace side through the “rudder ready” tubing to the stern of the kayak. While feeding the cable use the bike chain oil on the cable as you pass it through the tubing. This will help keep salt water and dirt out while keeping the cable sliding freely. You can also feed from the stern if it is your preference.

Click to Enlarge

Click to Enlarge
Step 7: At the stern of the kayak locate two 1/4 20 plastic screws in the molded inserts. Remove them. Using the Sealect Designs Tru-Course Bracket and the stainless 1/4-20 screws along with blue loctite fasten the bracket to the stern. The Bracket should be mounted as pictured with the longer end down. Slide the rudder post through the horizontal holes in the bracket and secure using the split ring.

Click To Enlarge
Step 8: On the rudder remove both plastic covers (2 small hex screws) on the rudder exposing the cable tie down point. Loosen the hex screw on the metal cable stop. Slide the cable through the hole in front of the rudder and slide under the metal plate or cable stop at a 90 degree angle so the cable points towards the back. You only need a 1/2 inch of cable beyond the plate. Tighten down on both sides.

Click To Enlarge
Step 9: Back at the foot braces using the included hex key locate a small hole on the face of the foot pedal. Slide the hex key into the hole with the pedal in the upright position find where the key slides in holding the pedal in place. This will be the center position.

Click To Enlarge
Step 10: Loosen the grooved guide at the top of the pedal enough to accept the cable. From the stern run the cable through the guide counter clockwise front then to the back through the groove and under running the cable through the adjuster. Now tighten the top guide.

Click To Enlarge
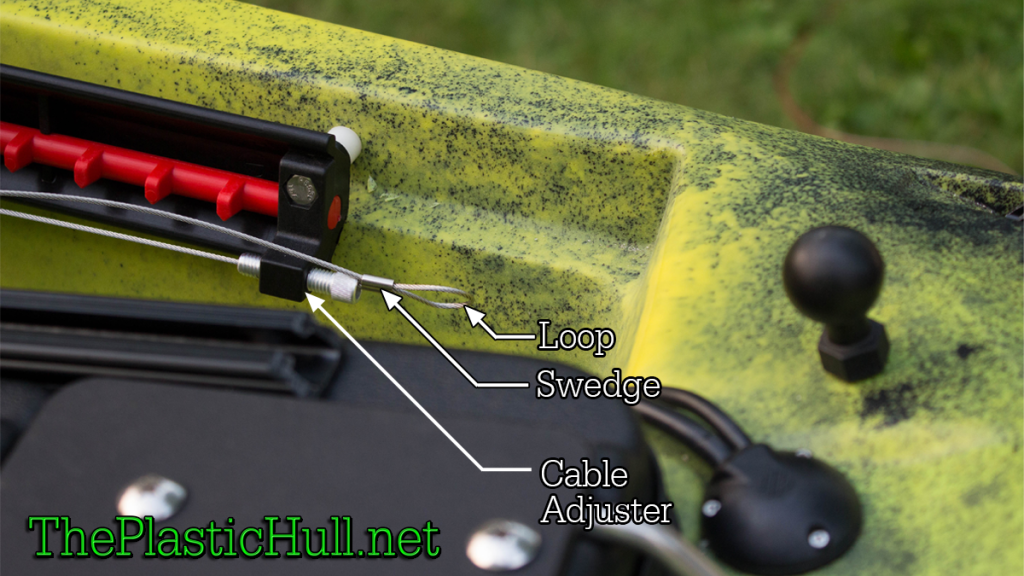
Step 11: Thread the cable adjuster almost all of the way in. Pulling the cable tight using a swedge make a loop and crimp. Cut the excess cable.
(Sealect Designs prefers to install with the cable swedged or terminated at the footbrace first at the cable adjuster then aligning the rudder and terminating the cable at the rudder.) This is your preference as i have found both ways are as good.
Step 12: Repeat steps 9-11 on the adjacent side.

Click To Enlarge
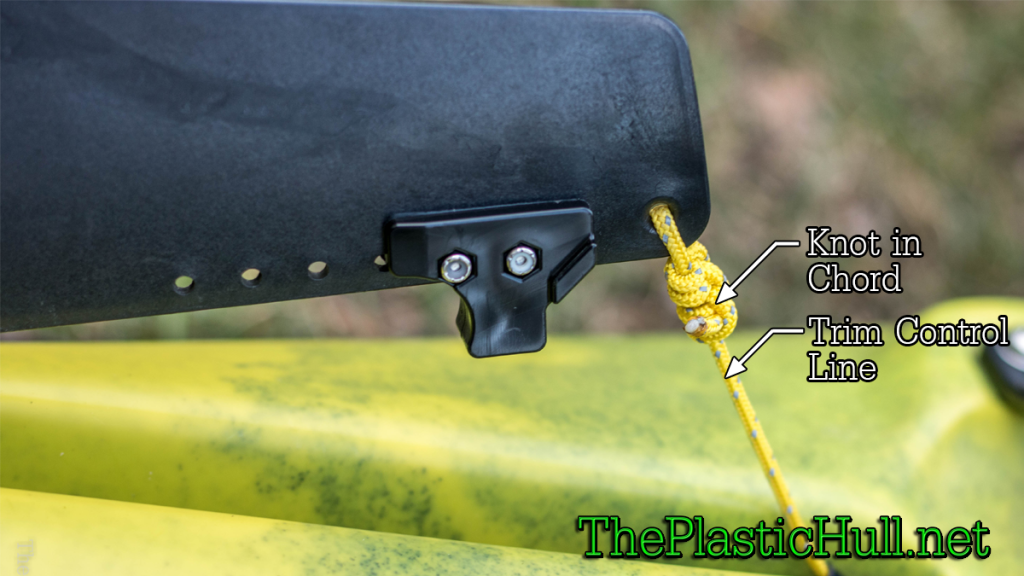
Step 13: Run the para-chord from the starboard trim control location. There is factory installed tubing that runs to the stern at the rudder. Tie the trim line to the hole at the top of the Tru-Course Rudder foil.

Click To Enlarge
Step 14: At the trim control location slide the trim stop ball onto the para-chord pull the rudder into the trip up position. You do not want the rudder to be parallel to the kayak let it be on a 30 degree angle. This will allow the rudder to trim down automatically. If tied down to tight the rudder may not deploy easily. Tie a loop in the end of the trim line around the J hook to secure.
This completes the Sealect Designs Tru-Course rudder install on the Jackson Kayak Kraken. Good luck, this was the best upgrade to the Kraken I have experienced! Much better turning of the boat keeping her straight in the wind top of the line rudder control and the most comfortable setup out there! The kayak was made for it!
Check out SealectDesigns.com for a local dealer with the dealer locator or call for availability! Phone Ryan at 425-252-2149 and let him know The Plastic Hull sent ya!!
 It was a warm day leaving work in the evening. The plan was to meet Brian Pickard at the launch around 7 pm. Upon checking the traffic I changed the time to 7:30. The timing couldn’t be more perfect leaving my house at that point. The traffic had dwindled down and taking the expected 20 minutes. Brian was at the launch when I arrived. We rigged up and launched around 7:45 just as the sun had set. The moon was just about full and was becoming brighter with every minute.
 Immediately 50 yards from the launch reading good marks on the Lowrance Elite 5 Chirp. Huge arcs meaning huge fish. The water had finally warmed up a bit which tends to make the fish more active. Brian and I begun trolling SP minnows. It wasn’t long before we had a few hits. Very short hits which became the trend. After fishing about 20 minutes Brian hooked up. I continued to troll while he went on a kayak sleigh ride. He landed the fish. It was a nice one at around 38″.
 Still getting short hits on the SP minnow a few other kayak anglers are now on the water. Its Jon Shein Stu and Andrew. After talking to them for a little bit commence trolling the tide is getting lower and the bite seems to have slowed down. The wind had picked up and made it a bit chilly. Brian had another fish that he lost at the boat as did I loose a fish about 10 feet away from the kayak. Unfortunate as this would be my last day to get out for the week.


